In a modern developed community, not a single person can refuse to watch television. News, entertainment shows, educational programs - an ordinary person is unlikely to be able to spend his day without this. And of course, in order to get the most out of watching TV, people choose high-quality means for broadcasting TV channels. It is considered the most reliable and popular equipment for this. But if purchasing it is not a problem, then how to configure channels on a satellite tuner? All information about this issue is presented below.
What is included in the satellite TV package?
Today, anyone can purchase a kit for installing satellite television. The standard and most optimal kit will cost from 50 to 80 US dollars. Typically the kit includes the following list:
- A tuner, or receiver, is also called a receiver. This is the most expensive part in the installation kit, and you need to choose it very carefully, since the quality of the video broadcast depends on it. It is better to choose a broadcast in mpeg4 format, but mpeg2 is also suitable. How to install it, and how to independently configure satellite channels on the tuner, will be discussed below.
- Antenna. Necessary in order to receive a signal. It can be from 70 centimeters to 1.2 meters in diameter.
- Head, or converter. There can be several of them at once, but models with three heads are more common. Each of them receives from one satellite.
- Multifeed This is the name of the special head mount. The standard kit includes 2 of them.
- Disek. He switches converters.
- TV cable. It should have a resistance of 75 Ohms and a length of 3 to 5 meters, with a small margin.
- F-connectors. Designed to connect parts of the kit. For a satellite dish with three converters, 8 such plugs are provided.
- Bracket and dowels (anchors) for mounting the antenna.
Before you independently configure channels on a satellite dish tuner, you should figure out how to properly install and configure the antenna itself.
Required Tools
To begin installing the antenna on hand, you must have:
- Extension cord for socket.
- A hammer drill for making holes to secure the bracket to the surface using dowels or anchors. You can also use a drill for this purpose.
- Drill bits for a drill or hammer drill.
- Two wrenches, 10 and 13 mm in diameter.
- Phillips screwdriver.
- Hammer.
- Insulating tape. Instead, you can use plastic ties.

Installation
- First, we completely assemble the antenna. All fasteners must be securely tightened. Bolts, washers and engravers should be carefully checked for strength.
- The next step is to attach the multifeed to the head holder on the right and left sides. Here we also screw in the converters themselves, that is, the heads. Don't tighten them too much.
- We fix the bracket to the wall and hang the antenna on it. It should be directed to the south or southeast. You can determine the direction of the world yourself, or you can look around and pay attention to where your neighbors’ antennas are “looking.”
What to do next?
In fact, the antenna installation is complete; now you should correctly connect all the cables between the antenna, tuner and TV. Please note that the cables are connected to the tuner only when it is not connected to a power outlet. It is not enough to simply turn it off; you must unplug the plug from the socket.
So, you need to make at least two connections. Then you need to figure out how to configure the channels on the satellite tuner yourself.
- We connect the antenna and receiver (tuner).
- We connect the tuner to the TV.
- If necessary, you can also make a third connection, namely, connect peripheral devices.

Connecting the antenna to the tuner
F-connectors should be screwed onto the ends of the cable from the satellite dish; they are needed for direct connection to the tuner. And on the tuner itself there is a connector called LBN IN, designed for this connection. This connector needs to be connected to the connector and screwed on. Before you configure the channels on the satellite tuner yourself, we remind you that the tuner must be completely disconnected from the electrical network during the connection process.
Connecting to a TV
You can connect the tuner to any of the TVs; for this, a number of special inputs are located on the rear panel of the receiver:
- antenna cable input;
- tulips;
- Scart or HDMI connector.
How to connect is selected either according to the capabilities of the TV (it all depends on its model), or according to the desired playback quality.
Connecting via HDMI is considered the best, the image quality will be at the highest level. Next, based on this criterion, the connection follows with the help of tulips. And in last place in terms of quality is the antenna output.

Only very old TV models have one antenna output without the additional ones listed above. New TV models have at least two connection methods from the above, and most often - all four.
But if it happens that the TV does not have other connectors other than the antenna, then you will need an antenna cable with special connectors, which are called “male antenna” and “male antenna”. These connectors are simply screwed onto the ends of the cable and the “female” connects to the tuner, and the “male”, respectively, to the TV.
All other connections are made using a connecting cable with appropriate connectors. Such cables can be included with your TV or satellite dish, and can also be purchased at any electronics store.
Receiver setup
It is best to start the process of getting acquainted with the menu of the purchased tuner by reading the operating instructions.
The first thing to do is to check whether the signal from the required satellite is being received.

Second, check the settings of the satellite heads. The head label should indicate its type and the local oscillator frequency required for high-quality operation.
Third, you need to set the correspondence between each satellite and DiSEqC ports. To do this, during installation you need to write down which head is connected to which of the DiSEqC outputs. Then in the tuner menu you should set the switch in the order in which the heads are connected to the ports.
If this was not done when installing the satellite dish, then you need to carry out this adjustment using the selection method, one by one selecting the corresponding satellites to the ports.
These are the basic settings that should be made before setting up channels on a satellite tuner.
Channel search
In order to search for channels on the receiver, you need to scan the corresponding transponder on a specific satellite.
First you need to find out the characteristics of the transponder. To do this, you need to decide on the channel that you want to broadcast. So, the channel has been selected, now you need to find out which satellite it is broadcasting on and look at the transponder settings for it. For example, let's look at how to tune an NTV channel on a satellite tuner. Note that the NTV channel is broadcast on the ABS1 satellite, and there are 2 types of transponder settings for it. If the receiver plays video in mpeg-4 format, then you need to make the following settings: transponder 11473, vertical polarization, speed 22500. If this option is not available, then you need to select a different speed (43200).
Now that all the information about the settings is known, the process of setting up an NTV channel on a satellite tuner will not take much time. You need to go to the settings of the satellite tuner and select the sub-item responsible for setting up the transcoder. In this menu, select or manually enter the appropriate settings for the NTV channel, and press the button on the remote control to start scanning. The TV screen should display a hint at the bottom of the screen (which button on the remote control is responsible for scanning).
Automatic search
When the button to scan has already been pressed, a button will appear on the screen with the option to select the type of scan. Depending on the receiver model, the names of menu items may differ slightly from each other. For example, when considering how to set up channels on an Openbox satellite tuner, the menu will suggest “Blind Search”, “Automatic Scan” and “Manual Search”.
Automatic scanning is convenient because you will not need to enter the transponder settings; the system will independently select all the transponders that the satellite dish receives.

If your search doesn't return any results
It happens that searching for a channel does not produce results, the antenna cannot reproduce it and displays a black screen when the settings are entered correctly. Most often the problem is that the antenna itself is poorly tuned. It’s worth checking, and it’s better, of course, to involve specialists in this field who can help at any stage of the process of installing and configuring a satellite dish and tuner.
You can also independently check the availability of the custom channel according to DVB-S or DVB-S2, MPEG-2 or MPEG-4 standards.
You can also double-check the settings for the selected channel; perhaps outdated information about the satellite, transponder and its speed was originally found. So, many users are faced with the problem of how to set up the Inter channel on a satellite tuner, because such a large media group is constantly developing, growing and changing. And in parallel with these processes, it changes satellites for broadcasting. This happened recently; now you can watch “Inter” on two satellites - Astra 4A or Sirius 5 with transponder settings:
- Frequency - 12399 MHz;
- Polarization - V;
- Speed - 27500;
- FEC - ¾;
- Standard/Modulation - DVB-S/QPSK.
Today, the process of how to tune the Inter channel on a satellite tuner can only be carried out in this way, and in no other way.
Creating a channel list
The instructions for each receiver contain a clause about creating a list of favorite channels, where everything is described step by step.
In order to go to the menu item on how to configure channels on the Eurosky satellite tuner, you should find “Channel Editor” in the general menu, and then “TV channels” and alternately mark the necessary and most interesting ones.

In most receivers, including the Orton tuner, you can configure satellite channels either using the joystick buttons on the remote control or using colored additional keys. This makes setup much easier.
All questions about how to set up channels on a satellite tuner have been exhausted, so you should carefully read these instructions point by point again, and you can start installing the satellite dish.
Last news:
Channel Hockey broadcast from the Amos satellite, 4w, frequency 11389, H, bit rate 27500. You can open the channel using the BISS encoding key: ID=000B, key 11 22 33 00 33 22 11 00.
First national received at frequency 10806, flow rate 30000 of the same satellite. BISS key parameters ID=0005, “old” key 10 06 10 00 11 07 11 00. The channels Humor, Real Estate, Music Box are now broadcast on the same frequency.
The TRK Ukraine channel in BISS encoding is broadcast from the Astra 4A satellite [formerly Sirius], frequency 12130, V, 27500. The channel opens if the key is entered correctly, see the section “Keys. Entering keys into the satellite tuner.”
For owners of satellite dishes receiving signals from the ABS satellite, 75E there is good news. The TNT+2 channel, frequency 12696, V, 5650, has been added to the list of open channels NTV, STS, PERETS, 2 X 2, Karusel, etc.
New channels are broadcast on the Hotbird satellite:
TV Rus, frequency 10604, H, 27500
STS Int. frequency 12245, H, 27500.
Many users of satellite dishes are familiar with the situation of a gradual reduction in the list of main operating channels compiled when connecting a satellite dish. Satellite television channels often change their technical characteristics: frequency, bit rate, etc. Almost every day, changes occur in satellite television: new TV channels are launched, “old” channels are transferred to other platforms, some channels are encrypted, others, on the contrary, are transferred to open source. viewing mode.
For example, in April 2010, a group of Amos satellite channels switched to the new broadcast frequency 11389, H, 27500: Inter, Inter+, NTN, K1, K2, Mega, Enter Film, Enter Musik, MTV UA, later they were joined by Gamma channels, RTR-Planet-ukr. The ICTV channel operates in open mode on the frequency 10759, H, 30000. To receive Inter Inter+ First channels, you need to register the channels and enter the keys. BISS keys for Inter Inter+ Pershiy channels and others are given in the “Keys” section. Entering keys into the satellite tuner.”
The latest data on the emergence of new channels or changes in broadcasting parameters of satellite channels can be obtained from the link: Transponder news
Information for owners of the “triple” satellite system HotBird-Sirius-Amos: the tuner, registered two years ago to receive channels in the “Hot Bird-Sirius-Amos” satellite television system, is now unable to receive even a third of the main programs broadcast from these satellites.
The conclusion is obvious: you need to refresh the channel list of your satellite television system more often.
If you have not yet learned how to independently edit channel lists in the tuner and register new TV channels, we advise you to fill this gap. By channel registration we mean the process of entering channel data into the tuner’s memory, including an identification code that allows you to highlight this channel in the general list of satellite TV channels.
Specific mechanisms for registering new channels and editing channels are given in the tuner service instructions, which are included when purchasing the tuner. For the ORTON 4100 C tuner and similar devices, brief operating instructions are given at the end of this section with a detailed description of the process of registering new channels.
Below are practical tips. The material is designed for owners of satellite dishes, as well as amateurs who are not specialists in the field of satellite television broadcasting.
Technologies update the list of satellite tuner channels.
You can update the channel list in the receiver in different ways. If you or your friends have a tuner of the same model with an updated channel list, you can transfer information from one tuner to another. The material is presented in detail in the “Tuner firmware” section. Another way to update the list involves “downloading” data from a computer, but for this there must be both a prepared list of channels and a “download” mechanism.
By “download mechanism” we mean a downloader program for your tuner model.
You can download: new tuner software; the latest tuner firmware along with the emulator, all settings, keys and channel lists. For more information about this, see the sections “Firmware for tuners” and “Satellite tuner software”.
This service is available to our clients.
A previously encoded channel may “stop showing” if its key has changed. In this case, you should refer to the “Keys” section. Entering keys into the satellite tuner.” There are lists of popular encrypted satellite television channels and key changing technology.
You can adjust the list of tuner channels yourself by devoting a couple of hours of free time to this matter.
For the Ukrainian audience, the list of satellite system tuner channels should begin with national channels that are broadcast from the “Amos” and “Sirius” satellites.
From the Amos satellite, Ukrainian channels are received from three transponders
By transponder, in this case, we mean a satellite transmitting device that broadcasts in one stream a group of channels united by common characteristics. These characteristics include: frequency (MHz), polarization, flow rate (SR), error correction coefficient (FEC).
The specified data is presented on the satellite television website: http://www.lyngsat.com/amos.html.
They can also be found in the monthly magazine of satellite and cable television “Telesputnik”.
Ukrainian channels:
1+1, OTV Music, TV Kyiv, UBR, Citi, TVI, Menu TV, Tonis, Unian TV.
received from one of the transponders of the Amos satellite are characterized by the following parameters:
Frequency 10722 MHz; polarization horizontal; flow rate 27500; FEC 3/4.
The meaning of the upcoming operation is to open the tuner menu and instruct it to “find by signs” in the general stream of signals coming from the satellite, those channels, the “signs” of which will be introduced to him from the tuner remote control. At the same time, the channels found “by signs” must be remembered and included in the “tail” of the tuner’s general list of satellite channels.
Since April 1, 2017, the 112 Ukraine TV channel has changed its satellite and is now broadcast from the AMOS-3 satellite. To continue watching the TV channel, you need to reconfigure the tuner to new reception parameters. The technical parameters for receiving the "112 Ukraine" signal are as follows: - satellite repeater: AMOS-3; - Orbital position - 4°W. - transmission format: MPEG-2; - modulation: DVB-S; - frequency: 11,140 MHz; - polarization: H (horizontal); - digital stream speed: 30,000 mega-characters per second; - FEC – 3/4.
Search for new channels
The technology for searching for new channels “by signs” varies among different satellite tuners, but there is also a lot in common.
1. Open the menu.
2. Select the “Settings” or “Installation” or “Installation” section. OK.
3. Confirm your intentions by entering the correct password - usually 0000. OK.
4.Open the “Channel search” or “Manual search” item, and then select a satellite for the “HUMAX” or “Samsung” tuner; or immediately select the “Amos” satellite for many other tuner models.
5. Next, the most difficult thing is to correctly indicate to the tuner the “signs” - parameters for searching for satellite channels. Data is entered using the number buttons on the tuner control panel. For the “HUMAX” tuner, the process consists of sequentially filling “windows” called satellites (Amos).
Frequency 10722
Polarization horizontal (H)
Flow rate 27500
For the “Samsung” tuner, before entering the frequency value, you need to set the transponder number (TR) to “new”.
For tuners such as “GLOBO”, BigSAT, “OPTICUM”, “OPENBOX”, “EVO 700 S”, the remote controls of which are equipped with a row of colored buttons at the bottom, after selecting the “Amos” satellite, you will first need to lower the illuminated window - the pointer to “selection” transponder” (select TP), press “OK” and try to find the desired one in the list of transponders, with the specified parameters. If the list of transponders does not contain the one you are looking for, you should go to the “edit” mode, then go to “add”, and only now enter the above parameters. After this, press the red “Transport” button. Sk.”
For the “STAR TRACK” tuner, after selecting a satellite to go to the list of transponders, you need to press the green “Cat / TR” button, then the blue “Edit transponder”, go to “add”, enter data, and press the red “scan.”
For “Golden Interstar”, after selecting a satellite, go to the right half of the table with the satellite parameters and activate the top line “install programs”. Then go to the list of transponders and add “new”, where you enter the specified data.
6. To start the channel search process, press the “OK” button, then, after completion, press OK again to remember the found channels, and then “exit” to exit the menu.
Newly registered channels will appear at the end of the general list of channels. If at this frequency, sometime before, channels were already registered and saved in the general list of channels, then they will not be registered again, but only those channels will be added that were not there, i.e. new.
In the future, the newly registered channels can be edited, i.e. move to convenient positions in the channel list.
If you manage to register several channels according to the above diagram, then the course of further work is only a matter of technique.
Ukrainian satellite channels M1, M2 Estrada, News 24 (Ukraine), QTV, First Business TV Channel STB, TVI, New Channel, ICTV broadcast from another transponder of the Amos satellite, have the following parameters:
Frequency 10759 MHz, horizontal polarization, flow rate 30000, FES 3/4.
Ukrainian satellite channels: Inter, Inter+, NTN, K1, K2, Mega, Enter Film, Enter Musik, MTV UA, Gamma, Hockey, RTR-Planeta-ukr. Broadcast from the Amos satellite transponder with the following parameters: frequency 11389, horizontal polarization, flow rate 27500, FES 3/4.
Ukrainian channels “Music Box Ukraine”, Humor TB, REAL ESTATE are broadcast from the “Amos” satellite and have the following data:
Frequency 10806 MHz, polarization horizontal (H), 30000, FES 3/4.
Christian channels are transmitted from the same satellite: CNL Ukraine, CNL Sibir, Life TV, JCTV Russia on frequency 11572, H, 8888.
In the “triple” satellite television system “Hot Bird – Sirius – Amos”, Ukrainian channels are received from two satellites: “Amos” and “Sirius”. We have dealt with the “Amos” satellite, let’s move on to the “Sirius” satellite.
Ukrainian channels from the Sirius satellite, 4.8 degrees. V. d.
Channels Glas, KR, 2+2, Pershiy, Rada, OK, SCI, Kanal 5 (Ukraine) have the following parameters:
frequency 11766 M G z, polarization H, SR 27500, FES 3/4.
Channels: A-One Ukraine, SCI, English Club TV, Ru Music, UBC, Star TV, Weather TV, Ukrainian Fashion, News One Channel, First Automotive UBC, UNT have the following parameters:
Frequency 12073 M G z, polarization H, SR 27500, FES 3/4.
TRK Ukraine is broadcast on frequency 12130, V, 27500
Ukrainian channel Tisa 1 is received at a frequency of 12672 MHz, polarization H, SR 3300, FES 3/4.
Russian (Russian-language) channels.
The following Russian-language channels are received in the “HotBird – Sirius – Amos” satellite television system:
The following Russian (Russian-language) television channels are received from the Sirius satellite:
TVCInew, frequency 1 2380 MHz, horizontal polarization (H), SR 27500, FES 3/4.
Belsat - Belarus, frequency 12380 M G z, polarization H, SR 27500, FES 3/4.
TV 5, First Baltic Music., frequency 11843 M G z, H, SR 27500, FES 3/4.
Travel, Romantica 2, frequency 12111 M G z, H, SR 27500, FES 3/4.
Pornographic channels are broadcast on the same frequency PG And P.B. .
The following Russian (Russian-language) television channels are received from the “Hot Bird” satellite:
Channel One Europe (ORT-international), EuroNews, frequency 12597, V, SR 27500, FES 3/4.
Russia 24, RTR - Planet, Chanson TV, frequency 11034, V, 27500, 3/4.
TV Rus frequency 11604, H, 27500.
R 1, frequency 1 1117, V, 27500, 3/4.
TV Arm Ru, frequency 12322, H, 27500.
RBK-TV, frequency 12520, V, 27500, 3/4.
K+, frequency 11623, V, 27500, 3/4.
Music Box Rus, frequency 11642, H, 27500, 3/4.
Child's smile (Smile..) frequency 11566, H, 27500.
Ru TV, CNL, Soyuz frequency 10815, H, 27500.
When purchasing a satellite tuner ORTON 4100, DIGITAL BOX, BigSAT BS-S 67CR or a similar device, in some cases the delivery package may not include instructions in Russian. In this case (and not only in this), the brief instructions for controlling the tuner, which are given below, may be useful. It describes in detail the process of editing channels, and also considers an example explaining how to register new channels.
Satellite tunerORTON4100 C
Operating instructions
Connection.
The tuner is designed to work as part of a satellite system. The signal from the satellite dish is fed to the tuner input using a cable. The cable has an F connector with internal thread. This connector screws onto the “IN” pin of the tuner.
The signal from the video output of the tuner (Skart or Tulip) is sent to the video input of the TV (Skart or Tulip) using the appropriate cable.
Selecting a channel to watch .
After connecting the tuner and TV to the electrical network, selecting a channel to watch is carried out using the remote control (RC) of the tuner.
Press the “OK” button on the remote control. We read on the TV screen [above]:
List of TV channels
< All Satellite >
Below on the screen is a list of channels, which includes the channels of all satellites [All Satellite], to which the satellite system is configured. The current channel highlighted in the list is broadcast in a reduced format in the upper right part of the screen. To go to the next channel in the list, you need to press the button located above the OK button, indicated by the ^ symbol, or the button located below the OK button. This will highlight the next channel in the list. The channel selected in this way is turned on by pressing the OK button, first in a reduced format, and by pressing the OK button again - in full.
Side buttons located to the right and left of the OK button, indicated on the remote control by symbols< или >, serve to move from a combined channel list, which includes all satellites, to the channel list of one specific satellite. For example, if your satellite system receives three satellites: Hotbird, Sirius, Amos, then by pressing one of the indicated buttons, you move from the channel list of all “All Satellite” satellites to the channel list of one of the three specified satellites. After selecting a channel for viewing in the channel list, turn on the selected channel by pressing the OK button. In viewing mode (when the channel list disappears from the TV screen), the function of the side buttons also changes< {слева} или >(on right). These buttons turn into volume controls.
Editing channels
The tuner has the ability to edit, i.e. delete, transfer or block channels. To enter the editing mode, you need to press the “Menu” button, in the window that opens, select “Channel”, press OK, select “TV Channel Manager”, press OK. The TV Channel Manager page opens with the All Satellite heading and a row of colored buttons at the bottom of the screen. The yellow button on the screen labeled Editor is a hint. Press the yellow button on the control panel. Next, enter the password 0000 using the number buttons on the control panel. The TV Channel Editor page opens on the screen. The colored buttons at the bottom of the screen are accompanied by a description of the function they perform. To delete a channel, you need to select it and mark it with the red button. To move, you need to select a channel and mark it with a white button on the control panel. The marked channel can be moved to the desired position in the channel list and press the OK button. The label from the marked channel will disappear and it will take a permanent position in the list. After moving the channels, press the “EXIT” button on the control panel. To the request Do you want to save? We answer in the affirmative by activating the OK window on the screen. To do this, press the side button< . Дальше нажимаем кнопку ОК пульта, затем, для выхода из меню, нажимаем кнопку “ EXIT ”не менее двух раз.
How to register new channels .
To register a new channel in the list of tuner channels, you need to know which satellite is being broadcast from, as well as the channel parameters: frequency, bit rate [or symbol rate, which is the same thing] and polarization, vertical (V) or horizontal (H).
For example, we register the channel Humor TB [Gumor TV], which is broadcast from the Amos satellite and is characterized by the following parameters: frequency 10912 MHz, symbol rate 22330, polarization H.
1. Using the remote control, open the tuner menu. Select “Install” and click “OK”. In this case, the “Installation” line is highlighted on the right side of the screen. Click “OK”. In the top line of the table that opens, select the “Amos” satellite. We go down to the third position from the top “TP number” [transponder] and click “OK”. In the table that opens with transponder parameters, we try to find the parameters of our Humor TB channel. If a line with parameters 10912 H 22330 is found, then select it and click “OK”. The table with parameters will close, and the number of our transponder will be highlighted on the screen.
Next you need to start the search mode for channels of the selected transponder. Let's pay attention to the colored buttons - hints at the bottom of the screen. The red button labeled Single in this mode starts a search for channels of all satellite transponders. To switch to the search mode for channels of one selected transponder, you need to press the yellow Edit button on the control panel. On the screen, the accompanying inscription near the red button will become “Transport.” Sk.” (scan). Let's move on to point 3 of the instructions.
2. If there is no line with our parameters in the table of transponder parameters, then close the table by clicking OK. Next, we edit the transponder table; to do this, first press the yellow “Edit” button on the control panel, then press the green “Add” button and fill in the empty data fields on the page that opens using the number buttons on the control panel.
In the Transport field Write down the frequency 10912
In the Symbol rate field we write 22330
The Polarization field should be Horizontal. The type of polarization is changed using the > button on the control panel.
Satellite television has long been nothing new to anyone - nowadays this luxury is available in most homes. But the installation of this structure continues to be considered a rather complex process that cannot be completed without the help of specialists. In some ways, this is indeed true - it is not so easy to install a satellite dish yourself. In addition, if a person does not have certain skills, this process can be dangerous for him. But setting up a satellite tuner without outside help is not at all difficult.
Possible reasons for the lack of a TV signal

If none of the above reasons apply, and the receiver categorically refuses to broadcast your favorite TV show, there are two options: seek help from specialists or try setting up the tuner yourself.
Setting up a satellite tuner
So, if for some reason the receiver’s settings have been violated, and instead of your favorite program, “No Signal” appears on the TV screen, do not rush to get upset. Expensive repairs are not required - the problem can be sorted out on your own.
First you need to find out what satellites is the dish tuned to?. This is not difficult to do if you remember what TV channels the tuner used to receive. Often one antenna is installed on three satellites: Amos, Astra And HotBird, sometimes heads for additional satellites are added to the antenna.
If there is easy access to the antenna
A specific satellite always corresponds to a specific head. If we are talking about a standard antenna for three satellites, they are arranged as follows:
- far left - HotBird (13°E);
- central - Astra (4.8°E);
- far right - Amos (4° W).
From each head comes a cable connecting it to the diseqc switch, which is located at the rear of the antenna. All diseqc inputs are numbered, and if you find out which of them the cable from the head is connected to, you can determine which satellite the switch number corresponds to. It is best to create a list and mark the corresponding number next to each satellite.
Having compiled the list, you can begin setting up the receiver:

If access to the antenna is difficult
If it is not possible to get to the satellite dish, setting up the receiver will be a little more difficult, since you will have to do it at random.
So, first you need to follow steps 1 and 2 of the above method. After that, switch to the “TP number” tab (in some models - “Frequency”, “Transponder”) and find in the list of frequencies the working one, that is, the one on which the channels you are interested in are broadcast. Press “OK” on the remote control.
Next, move to the DiSEqC (DiSEqC 1.0) tab and randomly select any number from the list. Click “OK” and look at the signal scale indicators. If they are close to the maximum value, we leave everything as it is; if not, we try other numbers until the signal scale indicators reach the maximum. We repeat these steps with each of the satellites and perform step 4 of the previous method.
All these tips apply to cases when channels on the receiver disappeared due to third-party interference(the firmware crashed, the user clicked the wrong thing, etc.). But what should you do if your favorite channel has simply moved to another frequency, and to one that is not in the tuner’s drop-down list?
Setting up TV channels in a satellite receiver
Since the settings menu on different tuner models may differ, let’s consider the principle of channel search using the example of the most popular of them.
Some receiver models have a so-called “blind” (that is, automatic) search across all frequencies, however, it is not present everywhere and does not always function correctly, so it is best to search for TV channels manually.
First of all you need find out the satellite broadcasting parameters of the required channels. Most often, a certain time before switching to another frequency, the channel notifies viewers about this by showing a text message with future broadcast parameters. If such a message appears on the TV screen, you need to write it down. If the change in parameters took you by surprise, you will have to look for the corresponding information in the frequency table.

TV channels found as a result of such a search are usually displayed at the end of the general list; previously found ones are not deleted, although before starting manipulations you can delete all existing channels by resetting the tuner settings to factory settings (the corresponding item in the installation menu will help with this). For greater clarity, you can watch a video on setting up the receiver.
If you are sure that you have completed all the steps correctly, but you were unable to set up the satellite tuner yourself, it is better not to risk it and contact the nearest specialized center for servicing satellite television systems.
Hello! Now I want to write a detailed article about how to flash satellite tuner Orton 4050c and also Globo, Digital, Opticum tuners - 4000c, 4100c and their clones. In short, all tuners that run on a processor Ali 3329C. But first things first. I decided to flash the Orton 4050c tuner myself, which I had been flashing a couple of years ago, some channels disappeared, and I was interested in how it was all done there, so I decided to study this topic a little and try it.
I will write about the firmware of the Orton 4050c tuner, because this is exactly the model I have. But this method is suitable for many tuners. Such as Globo 4100c and their clones, look at the list of clones. Orton 4050c is powered by Ali 3329C processor. To see what processor your tuner is running on, go to its menu and select system, information (may differ). I got this information:
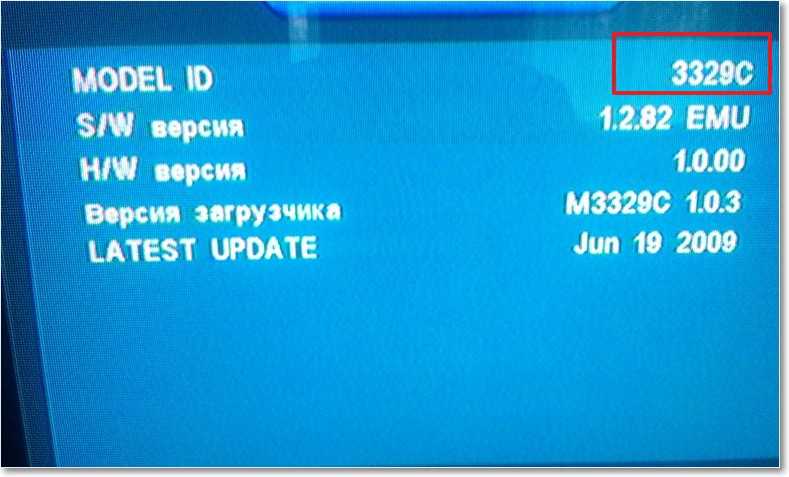
If you looked, and your tuner runs on a 3329C processor and is in the list of clones. Then this firmware method is for you, read on. Well, if not, then it’s better to read other articles on my blog.
Remember! You do all actions at your own peril and risk! You can kill the tuner! At first I was a little afraid, but when I realized what was happening, I calmed down, the main thing is not to do anything rash and follow the instructions. And this tuner costs about 200 UAH. (800 rubles), as a last resort, you can restore it in a service center via JTAG, well, that’s it, as a last resort, no matter what you say that I didn’t warn you.
What will you need to flash the Orton 4050c tuner and others on the 3329C processor?
1. The most important thing is probably RS-232 null modem cable. Mom-mum format. This cable connects to the COM port of the computer. If you have a laptop, then you do not have a COM port, so you need to look for a regular computer, or buy an adapter with USB to COM.
After reading about a cable for flashing RS-232 tuners on the Internet, for some reason I thought that finding it would be problematic; it would be easier to make it myself. But I had no desire to solder myself, so I went to the market and asked at the first store that sold satellite dishes. To my surprise, they had such a cable, I bought it for only 25 UAH. (100 rubles). It looks like this:

This means we have a cable, but if not, then buy it. And we continue :).
2. We also need, of course, a tuner, which we will flash, and a computer or laptop with an adapter.
3. Now we need to download the firmware for Orton 4050c. I will write about this in more detail.
This means the firmware comes in the form of a file with the extension .abs. And it weighs exactly 2 MB. This file is called dump. A dump is an exact copy of the satellite tuner memory. It contains a fully customized system, with updated and sorted channels.
We need to download a dump for our tuner, in my case it is Orton 4050c and upload it to the receiver. I got the firmware for my Orton 4050c receiver on the forum in this thread (go to the last page, there are always up-to-date firmwares). As far as I understand, dumps for our tuners are always posted there. Channels are always updated, etc.
Follow the link above, register, go to the last page in the topic and download the dump you like. After you download it, you need to extract it from the .rar archive. You should have a file with a .abs extension.
When describing a dump, the bootloader version and software may be indicated. It's okay if they don't match the versions on your receiver (with the data from the first screenshot). I fiddled with this a little, but then I found out that we will automatically update the bootloader and software version.
And one more thing, look at the description of the dumps, it indicates how many satellites they were made for. If you have, for example, three (as I understand the main) satellites (Sirius, Amos, Hot Bird), then it is better to look for the firmware for these three satellites. If you fly a dump designed for example for 8 satellites, then you will end up with some channels not working. But this is not a problem either, after the firmware you can simply delete satellites that you do not have.
So, we seem to have sorted out the firmware, let's move on.
4. The last thing we need is the program with which we will flash our receiver, in our case the Orton 4050c. The program is called System Upgrader, you can download it from the link.
It seems that everything has been assembled, and now the most interesting part is the firmware of the receiver.
Firmware for the Orton 4050c tuner and similar ones
1. We turn off the computer (just in case, so as not to burn the port) and connect the turned off tuner to it. I repeat, tuners must be disconnected from the 220V network. I'll tell you when to turn it on.


2. After connecting the tuner to the computer with an RS-232 cable, turn on the computer. We launch the System Upgrader program that we downloaded.
Setting up the program:
- Click open and select the dump. The file with the extension .abs that we downloaded for our receiver.
- We set the Com port. If you have one such port on your computer, then most likely you need to leave COM1. In any case, the Com port can be viewed in the device manager.
- Opposite “Type” be sure to put “allcode+bootloader”
- We don’t touch anything further and click “Next”.

The message will appear.

Attention! At this moment we plug our tuner into a power outlet.
If you have configured everything correctly, something like this should appear:

Don't press or touch anything! If at this moment, for example, you turn off the tuner, then most likely you will lock it up. I also do not recommend flashing if you have problems with electricity (it often turns off), for example during a thunderstorm.

By the way, during the firmware the tuner will blink.

After the firmware is completed, the tuner will reboot and the program will return to the previous window. After rebooting, the tuner will display the time. Now you can disconnect it from your computer. The entire Orton 4050c firmware process has been successfully completed.
Now you can connect our receiver to your TV and rejoice :). If you have questions during the firmware installation process, it is better to ask them on the forum, the link to which I provided in the article.
Update:
Actually, I don’t really want to do firmware for tuners, but a friend asked me to flash two receivers Globo 7010A. I think I will, I already have some experience, albeit a little :). So he brought me two Globo 7010A receivers, I immediately connected them to the TV, and looked at what processor they were running on, so that I would know what firmware to look for.

So it runs on the processor 3329B. Well, I found a new firmware (dump) on the forum and found out that you can upload it with the same System Upgrader program that I described in this article.
I did everything as expected, connected the tuner via RS-232 cable, opened the program, selected the dump, installed “allcode+bootloader”, started the firmware process and plugged the tuner into a power outlet. Everything seemed to be fine, one line went with the firmware process, then a second, and when the program already indicated that the firmware was completed, the port check began again and the firmware process started again, the line with the firmware process started again, then the second, and so on in a circle.
I waited, but the firmware did not stop and started again. The tuner was stitched in a circle. I was a little shocked, because you can easily kill a tuner that is not your own.
While it was being flashed there for the fifth time already :), I went to the Internet to look for a solution to the problem, but didn’t find anything useful. But you need to stop him!
Therefore, I decided to quickly unplug the receiver from the outlet when the firmware process was completed and the port check began again. I did just that, when the firmware wanted to start again, and this text appeared, I quickly unplugged the tuner from the socket.

To be honest, I thought the receiver was already done. But it turned out that even after such extreme firmware it turned on and worked, and it worked on the new firmware. Here's the story, be careful not to turn the receiver into a brick.
Setting up card sharing on the Orton 4100C / 4050C receiver
Cardsharing is a method in which one or more receivers will show paid channels from a satellite dish using cardsharing.
To achieve stable display of channels using card sharing, on “Orton 4100C / 4050C” receivers and clones such as Eurusky, Logus, Satcom, Globo in models 4100 and 4050, as well as Q-sat 0.8, Sky Prime 760 and other Globo-like ones. For these models, it is possible to use the configuration method using a PC (computer).
To do this, you need to connect the computer system unit to the satellite tuner using (this should only be done when the receiver is turned off, so that the com port does not burn out). In turn, the computer is connected to the Internet.
Also register on the cardsharing billing ( video about this stable, reliable cardsharing which has not only paid but also free packages) also under the video there is a link to register in cardsharing.
Well, to work with globe-shaped tuners, you will need to download a program into which you will enter your settings from cardsharing; more on this later.
You also need to scan the channels on the receiver under your selected television package, on the card sharing that I advised you above it will look like this. Here is a direct link to it - Cardsharing .

When you have scanned the channels, you need to activate the ball in the tuner. To enter the interface of the “Orton 4100C” receiver, you need to, standing on any of the scanned channels of the package, enter the combination 9339, after which you get into the receiver emulator and there you go to “Search for a card”.

Click OK and enter the next tab.

You need to find the “ShareMax” item and activate it (while standing on this “Share Max” item, press the OK button.

When finished, press menu or exit to exit the emulator section.
When this is done, you need to install the program " MPCS" on computer.

You need to enter the settings from the purchased package into it. They change in files server/conf/user, or there may be an empty field.
Having received the tinctures on cardsharing, you need to add them to the MPCS program. At the bottom you can see in the picture the settings from cardsharing for the Orton or Globo 4100C, 4050C “mpcs” receiver. server/mpcs. conf/mpcs. user"

In the Mpcs program, open the “Configuration Files” section and go to the “mpcs. conf" paste the copied setting text from cardsharing.

Here is this mpcs setting. conf you copy and paste into the program. Please note that # - the hash must be removed for Globo receivers and the like and to zero under the arrow, this is the com port, if you have com1 then there is zero, and if you use an adapter then your COM port can be anything. For example, if your COM port is 6, then you need to set the zero to 5.

In general, I think it’s clear. It will look like this. And click save.

Also copy the settings to the “mpcs. server" and save.

And copy the setting to the “mpcs. user" and save it the same way.

The next step is to return to the main “Log” section and press start.

And lo and behold!, the keys went and channels opened on the screen. And if a miracle does not happen, then click on different channels, maybe some channel does not open for an unknown reason, or even more than one, perhaps it will open at the wrong time, the same thing happens, and a miracle should happen. The channel may take a few seconds to open, this is normal.


As a result of these manipulations, you get stability and high-quality viewing of TV channels, as well as very fast interaction with the satellite and speed of gear switching.
We hope our article helped you with useful information and you now know how easy it is to set up cardsharing .
Your questions will be answered faster in the forum.

")
