And Galaxy J7 (2017). The first one still stands out, while the other two are clearly more expensive and more advanced. However, this time it was decided to highlight the Galaxy J7 (2017).
Nowadays, the Samsung Galaxy J7 (2017) looks more like a lightweight representative of the Galaxy A line. It does not have individual features such as water resistance, the characteristics are slightly worse, but in many features the device is very close to its older brothers. For example, it is distinguished by its support for the Always On function - this is something other “Jacks” simply do not have. There was also a fingerprint scanner and so on. I won’t list everything here, otherwise you won’t read the article. So let's get started: Galaxy J7 (2017) review in detail!
Video review of Samsung Galaxy J7 (2017)
Design
So, I have in my hands the Samsung Galaxy J7 (2017), the third generation of this smartphone.
I must say that it changed from year to year. So the very first device was made entirely of plastic and was a “standard Samsung”. The second one acquired a metal edging and received aluminum sidewalls. And now the Galaxy J7 (2017) is made entirely of metal.

From the front side, the handset looks very solid, somewhat reminiscent of the same Galaxy A. It has a thinner frame around the screen, and at the same time they added fashionable 2.5D glass.

The back is really all metal, with the exception of the antenna inserts at the top and bottom. But they don’t spoil the impression; on the contrary, they are designed quite well, not at all like other smartphones. In addition, the gold color looks good, that is, we had the Galaxy J7 (2017) gold. There are also black Galaxy J7 (2017) black, blue Galaxy J7 (2017) blue and pink Galaxy J7 (2017) pink.

The Galaxy J7 (2017) has a “normal” protection standard, that is, IP54. In other words, it is protected from small splashes and dust, but it is better not to drown the phone. At the same time, the build quality is excellent, although I have not yet encountered anything different from Samsung. And now this is more than expected - the case has become non-separable!

The smartphone turned out to be moderately thin (8 mm), but weighty - 188 grams. Even for a 5.5-inch tube this is decent. Apparently, the presence of a capacious battery has an effect, although again, the thickness is small.
As a result, I can conclude about the Galaxy J7 (2017) that it looks good, feels great in the hand, the metal pleasantly cools the palm and generally leaves behind an extremely favorable impression.
Connectors and controls
In terms of connectors and buttons, the Samsung Galaxy J7 (2017) is the most classic! They even left microUSB!

There are so many elements placed above the screen that I sinfully thought that the iris scanner had somehow migrated to the Galaxy J7 (2017). In fact, there is nothing like that - there is an LED backlight for the front camera. There is a lens of this same camera, light and proximity sensors, as well as a speaker.

Below the screen you can see a mechanical Home button and two touch buttons for Back and recent applications. The touch buttons are not backlit, and in Home, as I said, a fingerprint scanner was built in - for the first time in the Galaxy J line.


Working with fingerprints is exactly the same as in all Samsung smartphones. In the Lock screen and security settings section, you can add multiple fingerprints. But before that you will need to enter a PIN code, password or graphic pattern.


Then all you have to do is scan your finger and that’s it – you can use it to unlock the phone. Moreover, you just need to touch the sensor and the screen will immediately turn on. Our short video will tell you how to work with the Samsung Galaxy J7 (2017) fingerprint scanner:

On the reverse side at the top you can see the main camera lens with LED flash and the antenna insert.

At the bottom rear there is only the antenna insert.
On the left side you can see two buttons for volume control, compartments for SIM cards and memory cards.

Samsung has stopped doing nonsense and now equips its smartphones with three full-fledged connectors: two for SIM cards and one for microSD. I note that the Galaxy J7 (2017) only supports nanoSIM - finally, even state employees are starting to switch to this standard. Card trays are removed using a paper clip or ejector. If something doesn’t work out for you, our short video will help you solve the problem:

The power button and speakerphone were placed on the right side.

All other elements are placed at the bottom: a conversational microphone, microUSB and an audio connector. As I said, Samsung has not yet switched to USB Type-C in the Galaxy J series, apparently this will happen in 2018.

The top end is empty - there is no microphone for noise reduction. There has to be some way to differentiate the Galaxy J from the Galaxy A, right?
In general, the Galaxy J7 (2017) is a classic in terms of ergonomics. All the buttons are in the usual places, the card slots are full, the microUSB is in place, the minijack for the headset is conveniently located at the bottom - what else is needed for happiness?
Buying a case or cover for the Galaxy J7 (2017) is very easy, since it is an extremely popular smartphone model. I’ll say more, I even got my hands on one case!


This silicone case for Samsung Galaxy J7 (2017) costs about 1,000 rubles. Moreover, this is a branded accessory, and even made in the main color of the smartphone.
There are also books and other covers for the Galaxy J7 (2017) - they will be easy to find.
Galaxy J7 (2017) screen
Samsung Galaxy J7 (2017) stands out significantly from its predecessors. If anyone doesn’t know, both previous generations came out with Super AMOLED screens, but their resolution was 1280x720 pixels, clearly emphasizing the mass positioning of smartphones. But the new device, which was made for 2017, has a 5.5-inch Full HD display.
Galaxy J7 (2017), thanks to its 1920x1080 resolution, provides a noticeably higher pixel density - 401 ppi versus 267 ppi for previous phones. And the Galaxy J5 (2017) does not shine against its background, offering only 282 ppi. In general, in the new generation, the older model in the line stands apart, offering the best screen.


However, the new Galaxy J7 (2017) is not only good for its screen – the smartphone also supports the Always On Display function. If anyone doesn’t know, it was first introduced together with, and later the entire Galaxy A series got it. And now the J7 (2017), which became the first of the “Jacks” with this most useful feature.


For the uninformed, I’ll tell you what it does – the time and various notifications are always shown on the screen. Or this can be replaced with a calendar or just a picture. As a result, useful information appears before your eyes, but little energy is spent on this matter, thanks to the Super AMOLED screen.
Meanwhile, the Super AMOLED matrix does its job and provides a very pleasant picture, with good colors, rich and rich. The viewing angles are wide, the image is clear and does not fade in the sun. And finally, there is support for auto-brightness adjustment - a small but extremely useful option that its predecessors did not have.
Objective measurements also speak for the Samsung device. So the brightness was measured at 296.75 cd/m2, which doesn’t seem like much, but in fact, under the sun in automatic mode, the phone can raise it noticeably higher. The black color is truly black, since we are dealing with OLED technology.

The color gamut, as expected, covers the sRGB color space, especially when the Adaptive profile is enabled. There are no problems with color rendering.
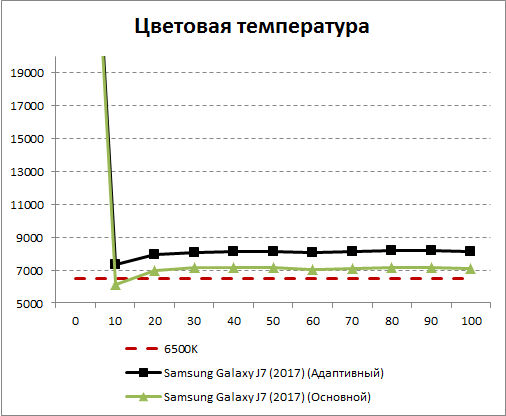
Color temperature is slightly higher than usual. In the case of the Adaptive profile it is at the level of 8000-8200K, and for the Basic profile it is much closer to the reference value of 6500K. However, Samsung devices usually have a slightly warmer picture.

The gamma curves look pretty good. Only when the Main profile is turned on does it appear in the middle, that is, the average brightness shades of the image appear lighter than they should be. But this is invisible to the eye.

As expected, the Galaxy J7 (2017) can handle dozens of touches at once.


In the screen settings you can now find a complete set: automatic brightness adjustment, selection of color profiles and even adjustment of individual color channels.
As I already said, the Galaxy J7 (2017) in terms of screen seriously stands out both from its predecessors and from other smartphones in the Galaxy J series. It has a noticeably higher resolution and has Always On support - all this is typical for devices of the Galaxy A line, which cost noticeably more.
Galaxy J7 (2017) camera
The evolution in terms of cameras in the Galaxy J7 is not very noticeable for the average person: all three generations of smartphones offer a sensor with a resolution of 13 MP. Of course, its models differ, and the Samsung Galaxy J7 (2017) has the best optics - the lens aperture was increased to f/1.7, versus f/1.9.


The control application is standard for Samsung devices. The one that the Galaxy S8 has was taken as a basis. Swiping on the right opens color filters, and on the left – available modes.


For advanced shooting, the Pro mode may be of interest, where you can adjust white balance, ISO sensitivity and exposure compensation.


The maximum resolution of 13 MP is achieved when choosing an aspect ratio of 4:3.


The camera takes decent pictures. The footage comes out clear, with good white balance. Of course, the brightness is not always well adjusted, but this is unlikely to bother many. Even in the evening something comes out tolerable.

Video is captured in Full HD resolution.
The video looks decent, also sharp, with good colors.

The front camera has been updated much more seriously - instead of 5 MP, a 13 MP sensor is now used.


From the pictures taken from the front camera of the Galaxy J7 (2017), you can clearly see that the number of megapixels does not mean their quality. The resolution is high, but everything is blurry and not very beautiful. The white balance is normal, the brightness seems to be the same, but at night the camera does not produce the best pictures.

The video from the front camera also seems to be of “high quality”, with Full HD resolution.
However, it has all the same problems for photography: it lacks sharpness.
Moreover, given the positioning of the Galaxy J7 (2017), it takes good pictures and videos. I'm talking about the main camera - everything there is more or less decent. But the front camera blurs the picture and this is not very pleasant.
Specifications Galaxy J7 (2017)
The Galaxy J lineup for 2017 includes three main devices: J3 (2017), J5 (2017) and J7 (2017). Moreover, for certain markets, the latter was multiplied by budding in two more versions: Galaxy J7 Pro and Galaxy J7 Max. The processor and screen of the first one are the same as our J7 (2017), but in the minimum version it has more memory, both RAM and flash. As for the J7 Max, it is a 5.7-inch device based on the MediaTek chipset, with a PLS display and also a decent amount of memory: 4/32 GB. It is produced only for India.

Above, I described how many changes happened with the Samsung Galaxy J7 (2017) compared to the 2016 device: screen resolution, cameras, various interesting features appeared. But what about the rest of the hardware?


Everything is generally not bad, except for the fact that the processor has not been updated in any way in a year. The same Exynos 7870 Octa with eight Cortex-A53 cores operating at 1.6 GHz is used. On the other hand, this is a decent mid-range chipset and we can’t say that it has become obsolete.
Inside it is installed, although not the newest, but still not the old Mali-T830 MP2 video card. This accelerator is also not the fastest, nor the most budget-friendly, but there are still better options. Moreover, it has only two execution units.

But they installed more RAM – 3 GB, also available for the first time for the Galaxy J line, including among the 2017 models. But there is only 16 GB of flash memory, which is logical - 32 GB was left for individual local versions and for the older Galaxy A series.
As for the rest, I will note changes in terms of communications. So Wi-Fi was extended to support the 802.11ac standard, and at the same time the battery capacity was increased by 300 mAh. For this I had to pay for it by 11 grams of increased weight and a 0.2 mm thicker “waist”.
In principle, the parameters of the Galaxy J7 (2017) look more or less normal, but at the middle class level, but nothing more. There is nothing very outstanding about them.
Performance testing
The performance difference between the Samsung Galaxy J7 (2017) and Galaxy J7 (2016) should not be serious. Let me remind you that they have the same processor, and the amount of RAM is larger in the first device.
Basemark OS obviously leans more towards expanded RAM, as the 2017 smartphone was slightly faster here.

The JetStream browser test also remained with the J7 (2017), but its advantage here is much less significant.
Graphics benchmarks agreed that the platforms of the phones are the same, and therefore there is no need to strain - the results are almost identical.
Galaxy J7 (2017) in Antutu
Now let's see how things are going in the popular Antutu system-wide test.


The result is similar to Basemark OS, although the superiority of the Galaxy J7 (2017) is less obvious. The difference will not be noticeable to the eye.
Autonomy Galaxy J7 (2017)
We will check the autonomy of the smartphone using.

What can I say, the battery life of the Galaxy J7 (2017) is good, one of the best, I would say. True, the J7 (2016) has it even better. Yes, its advantage, according to the diagram, is minimal, but there is a nuance: the battery capacity of the 2016 model is 3300 mAh, while the current one is 3600 mAh. Again, this doesn’t mean anything, it’s just that a year earlier the phone showed almost a record result, and now it’s only slightly worse.

As you can see, the energy consumption profile is completely typical. The maximum falls on 3D graphics, while everything else consumes very little battery.


In addition, the latest version of the Clean UI shell has many ways to optimize energy consumption.


Among other things, different profiles have appeared where you can configure how the phone will work. Here you can set the brightness of the screen, how the processor works, disabling wireless networks, and the like.
Overall, the Galaxy J7 (2017) is a fast smartphone with excellent battery life. A sort of workhorse that will appeal to many.
Games on Galaxy J7 (2017)
No problems are expected with games on the Galaxy J7 (2017).

- Riptide GP2: excellent, the game does not slow down;

- Asphalt 7: excellent, the game does not slow down;

- Asphalt 8: excellent, the game does not slow down;

- Modern Combat 5: excellent, the game does not slow down;

- Dead Trigger: excellent, the game does not slow down;

- Dead Trigger 2: excellent, the game does not slow down;

- Real Racing 3: excellent, the game does not slow down;

- Need For Speed: No Limits: excellent, the game does not slow down;

- Shadowgun: Dead Zone: excellent, the game does not slow down;
- Frontline Commando: Normandy: did not start;

- Frontline Commando 2: excellent, the game does not slow down;
- Eternity Warriors 2: did not start;

- Eternity Warriors 4: excellent, the game does not slow down;

- Trial Xtreme 3: excellent, the game does not slow down;

- Trial Xtreme 4: excellent, the game does not slow down;
- Dead Effect: not in Play Store;

- Dead Effect 2: excellent, the game does not slow down;

- Plants vs Zombies 2: excellent, the game does not slow down;

- Dead Target: excellent, the game does not slow down;

- Injustice: Gods Among Us: excellent, the game does not slow down;

- Injustice 2: excellent, the game does not slow down.
As you can see, all games work without issue. Another problem may arise with the Galaxy J7 (2017) - 16 GB of flash memory is not enough for a large number of modern games
BY
Like all 2017 smartphones, the Samsung Galaxy J7 (2017) comes with Android 7 out of the box. Undoubtedly, Android 8.0 will be released for it when all flagships and more expensive devices are updated.


Meanwhile, the device offers the Clean UI shell interface, which is familiar to owners and users of Samsung equipment.


It differs from the original Android, but not very much. So the notification panel offers various display options: from a thin strip of recent notifications and quick settings, to a fully expanded view.
How to set a ringtone for a contact in Samsung Galaxy J7 Neo
A unique melody is just begging for some contacts, especially for loved ones and family. How to install it in the new Samsung.


You need to go to Contacts, select a contact there and click on it. A menu will pop up where you select the Information item. This is how we get in touch. Next, select change at the top and scroll to Ringtone. He's downstairs.


By choosing to change the melody, the user will be taken to a window where, at first glance, there are only standard melodies. However, if you scroll to the end of the list, you can see another item that allows you to set a melody from memory. Here the user will be offered a choice of OneDrive, Google Drive and Sound Selection. The last point is access to the file manager. Next, you can select a song from the drive.
The ringtone is set.
If you have any questions, watch our video on how to set a ringtone for a contact in the Samsung Galaxy J7 Neo.
How to put a photo on a contact in Samsung Galaxy J7 Neo
A photo attached to a contact at least makes the phone book more beautiful. It's very easy to assign or change a photo for a contact
To change a photo for a contact, you need to go to Contacts, select the desired entry, and click on it. Next, in the pop-up menu, click on Details. This is how the user gets into the post. Here you need to click edit and then immediately click on the contact’s photo.


After selecting a snapshot or a new photo, you can crop the image and apply various filters to it.
The contact now has a new photo.
You can also watch the process in our video on how to install a photo on a contact in the Samsung Galaxy J7 Neo.
How to set a ringtone in Samsung Galaxy J7 Neo
A custom ringtone helps distinguish one calling phone from another. Changing the standard melody is easy.

First of all, in the settings menu you need to find the Sounds and vibration item.


Here, as in the case of a contact, a selection of standard melodies is first offered, but at the very end of the list there is an Add from phone option. By selecting it, you can go to the manager, where you can easily find the desired composition.

Select a melody, click confirm and voila - the Samsung Galaxy J7 Neo ringtone is installed. To reinforce the material, you can watch the video.
How to create a folder on Samsung Galaxy J7 Neo
A new folder on the phone's storage or microSD memory card is created through the file manager, which Samsung calls My Files.


In the file manager, you first need to select the location of the future folder.


Having selected the desired location, you need to call up the menu in the upper right corner by clicking on the three dots. Here, select Create Folder. After this, enter the name of the folder. The folder has been created!
Making a video tutorial on how to create a folder on the Samsung Galaxy J7 Neo is much more difficult.
How to clear memory on Samsung Galaxy J7 Neo
No matter how big the drive is, it will eventually run out of space. The Samsung Galaxy J7 Neo phone manager is hidden in the settings. It can also be accessed through Samsung Members or the notification panel.


It is located in the Optimization section. After launching it, you need to select the Memory tab.
Here the smartphone will offer content in some categories for deletion. In order not to lose important photos or records, you can go to each category and deselect truly valuable things.
The video instructions will explain how to clear the memory of the Samsung Galaxy J7 Neo literally on your fingers.
How to Transfer Contacts from SIM Card to Samsung Galaxy J7 Neo
For some, all contacts are stored on the SIM card. Sometimes they need to be transferred to the tablet


To transfer contacts from a SIM card to a smartphone, you need to go to the Contacts application. Here, in the menu located in the upper right corner of the screen, click Manage contacts. Next you need to select Import/Export contacts.


Next, select Import VCF file, then file location - SIM card. After this, a list of contacts on the SIM will open, where the ones you need are marked. Finally, the import location is selected: phone, Google or Samsung contacts. All that remains is to click Import at the bottom of the screen.
Video instructions will help the most dull.
How to choose a SIM card in Samsung Galaxy J7 Neo
Assigning a card through which calls to the Samsung Galaxy J7 Neo will be made is as easy as shelling pears.

When you dial a phone number, two call buttons appear at the bottom of the screen. However, it corresponds to SIM-1, the second one corresponds to SIM-2. Accordingly, if you click on the first button, the call will go through one network, and if you click on the second, through another.


When sending SMS, the choice of SIM card is available after creating the room. If you click on the yellow button, a pop-up window will open where you can select a SIM card.
The video instructions will answer all questions.
If you have any questions about the techniques described, or have other unresolved problems, then ask about them below in the comments!
One of the inexpensive smartphones in the galaxy line, as you know, is the J7 model. The device was released quite recently, and can without a doubt be considered a budget option. There are several factors that determine its price segment. These are characteristics, inherent features, and choice of materials. In any case, those who cannot afford flagship models will certainly find something of their own in the J7. And if you prefer this device, make sure you get the most out of it. This can be done by installing, the official assembly of which is already in the public domain.
After installing TWRP for J7, you can easily install both official and unofficial firmware. Of course, carrying out such a procedure requires great care and great responsibility. Therefore, you must first study the instructions described below, and then proceed to reinstall the recovery.
In addition to the fact that this procedure allows you to independently configure the system, it also allows you to:
open root rights;
;
install firmware and kernels yourself;
improve processor performance;
remove unnecessary applications.
Since this release of TWRP Recovery is official, it works perfectly on Galaxy J7. Flawless request processing, the absence of the slightest freezes and long-term glitches proves this. Moreover, the program is perfect even for users with minimal skills, since it has a simple and accessible internal shell.
Before introducing you to the step-by-step guide and before directly starting work on installing TWRP Recovery on the Galaxy J7, I would like to draw your attention to a number of preliminary procedures:
create a backup copy of the existing (current) firmware;
We save information that is valuable to you: photos, videos, music, work files, call logs, SMS, settings, etc.
This is done for one simple purpose: so that you can recover in case of failure. And usually something goes wrong if such articles are not read carefully enough. Well, in general, you understand what I am calling for.
Be aware right away that the firmware is not a traditional installer that is limited to one or two clicks. Here you need to really work with your hands. For those who are doing this not for the first time, it will be easier:
We begin, as in most cases, by preparing the PC. We turn off anti-virus protection on it, as this interferes with the flashing process;
Using the Kies utility, install USB drivers for the Galaxy J7 on your computer;
Of course, we put the smartphone and sync cable in front of us in advance;
Next, you need to open special features on the device. To do this, go to settings, and then to the “about phone” tab. Multiple clicks on the build number activate Developer Options;
Among other things, you need to check USB Debugging, that is, the USB debugging option (it must be enabled). To do this, go to the “developer options” in the settings;
The device's battery must have at least half its charge before starting the procedure. Premature shutdown of the J7 during installation can cost money, wasted time going to a service center and nerves;
Please note that this version is created exclusively for the Galaxy J7 (j7elte). Using the firmware for other models or brands may result in adverse consequences.
Now, in fact, the process of installing TWRP Recovery on the Samsung Galaxy J7:
if at the preparation stage you did not take care of installing drivers for the Galaxy J7, install them now on your computer;By clicking on the hyperlink, download the program to your PC. Everything is simple here: download the archive, extract its contents and install;
download the file in the same way and unpack it;
run the Odin program;
Shut down your Galaxy J7 and then start it in download mode. To do this, you need to press and hold the following keys for a few seconds: power, “volume +” and “home”;
synchronize your PC and smartphone using USB;
if everything is done correctly, then after synchronization in the Odin program window, the ID:COM field will be highlighted in yellow or blue. Otherwise, you will have to reinstall the USB drivers and repeat the procedure again;
Next, click on “PA” in the Odin utility window. Then – specify the TWRP Recovery file;
Uncheck "Re Partition" and "Auto Reboot" if they are checked. Then press “START”. Monitor the installation carefully. If it freezes, reinstall the USB driver and repeat the procedure;
wait until “PASS” appears in the Odin window and the ID:COM field changes color to green;
disconnect the USB cable and perform a reboot. In recovery mode, select two commands: “wipe data factory reset” and “wipe cache partition”.
Frequently asked questions - a collection of frequently asked questions on any topic and answers to them. In our FAQ on Samsung, we tried to collect the most popular questions and answers to them found on our forum. In order to find what interests you, just select your Samsung model from the list or use the search.
Where can I see the technical specifications of the Samsung Galaxy J7?
How to free up RAM?
Will the alarm ring if the phone is turned off?
Can I use my phone while charging? Does its use affect the charging process itself?
The Internet icon on the smartphone periodically began to disappear and the network was completely lost. What to do, how to cure?
Possible problem with your SIM card. Start with something simple: distort the card, clean the contacts. Remove the SIM card from the holder tray, clean its contacts with an eraser (be sure to thoroughly clean off any debris from the eraser) or, better yet, wipe them with alcohol. Insert the SIM card back into the tray. %
If the problem is not solved, then contact your mobile operator to replace the old card with a new one. The exchange will be made free of charge and with the preservation of the number.
Suddenly the battery began to discharge quickly, how can you find out what is eating up the battery?
Use the built-in Battery Usage feature to find out how long the screen is on, how long the battery is charged, how your phone is used in active mode, what the quality of your mobile connection is, and also view a graph of battery usage by different apps. %
Menu -> Settings -> Battery (or Energy Saving) -> Battery Usage.
How can I switch my phone to silent mode during an incoming call so as not to hear the call?
When I charge my phone, it gets quite hot. Is this normal, will it damage the device?
Forgot pattern/PIN/password. How to unlock your phone now?
One of the simplest options is unlocking through a Google account. If you have added a Google account to your device and remember your login and password, then use this advice. %
Enter the wrong password five times, a Forgot your password? button will appear on the lock screen, and when you click on it, a window for entering your account information will appear: e-mail (@gmail.com) and password. After entering the data, you will be asked to select a new method for locking the device. Here you can create a new password or refuse to use it. %
If you don't have a Google account, then you can reset your data using the physical buttons on your phone, but all your personal data will be lost.
Why do I sometimes see the answer buttons when I receive a call, and sometimes the unlock sliders?
The lock slider for an incoming call appears if the smartphone screen is locked at the time of the call, and if the screen was turned on, you will see the usual buttons.
Can I change the password for an existing Samsung account? If I can, then how?
You can change your Samsung account password. To do this, press Menu -> select Settings -> Accounts -> select Samsung account -> Profile -> now enter the current account password to log into it -> My data tab, click the Change button next to Password -> enter the current password again -> enter a new password -> confirm the new password -> click the Confirm button.
Numbers in the phone book must be added in international format. %
That is, the number should look like this: +(country code)(operator code)(phone number), for example, Russia MegaFon: +7921хххххххх, Ukraine Kyivstar: +38098хххххххх.
How to take a screenshot?
How not to lose information when replacing a memory card?
There are no special features for replacing the memory card; there is no need to flash the device. It is necessary to format the new memory card and copy all the contents of the old memory card to the new one (this is best done on a computer), and the display of hidden and protected files must be enabled on the computer. Then turn off the phone and replace the memory card. The phone will work as before, but with a different memory card capacity.
How to disable automatic phone switching to winter/summer time?
Go Settings -> Date and Time. Uncheck the boxes next to the items Automatic date and time detection And "Auto detect time zone", then manually select your time zone from Time Zone.
How to find out the MAC address of a WI-FI phone?
1 way. Menu -> Settings -> Device information (About device) -> Status -> Wi-Fi MAC address. %
Method 2. Menu -> Settings -> WI-FI, click Menu -> Advanced -> MAC address.
When the phone is charging and I try to work with it, the screen sensor glitches and does not respond to touches. Is this a marriage?
If the power supply is unstable while charging, the sensor may not respond to touches. Disconnect charging and check the sensor operation without it. Use stable power sources.
I have a backup of contacts in the form of a large number of vcf files (each contact has its own vcf card). How can I combine them into one file to make it easier to import into my phone?
If the files are not stored on your PC, then transfer them there to a separate folder. Run the copy /B *.* contacts.vcf command in it and get the merged contacts.vcf file. %
If you don’t know how to execute the command, then do the following: in the folder with vcf cards, create a text document (file tab -> create -> text document). Open it, copy the command “copy /B *.* contacts.vcf” (without quotes) there, save the file. Rename the file extension from txt to bat. Run the file by double clicking the mouse. The contacts.vcf file will appear in the folder next to it.
Why don't people sometimes call me when I'm on the Internet?
If your operator supports only 2G network type, and accordingly you are on a 2G network, then in this case this situation is considered normal. 3G networks already allow the user to use the Internet and receive calls at the same time, but much also depends on the operator’s equipment and the current network load.
How to glue protective glass evenly?
One of the simplest ways is to stick glass using “loops”. Lay the glass on the phone, straighten it, glue strips of tape on the glass and phone, like on the door. Open the glass like a door, degrease the screen and wipe it well. Remove the protective coating on the glass and place the glass on the screen (close the door). The glass itself will stick to the screen gradually. You can find many example videos on YouTube.
The phone is frozen and does not respond to buttons, how can I reboot it?
1. Try pressing and holding the Power key for about 10-20 seconds. %
2. If the back cover of your smartphone is removable, then remove it, take out the battery for a few seconds and insert it back, then put the cover back on. Now turn on the device. %
3. If the cover is non-removable, then press the Power and Volume keys at the same time and hold them for about 7 seconds until the device reboots.
I still have a file in vcf format from my old phone, in which all my subscribers from the phone book are saved. How can I use it to transfer contacts to my new phone?
There are several options, one of the simplest solutions would be: send a letter to your mailbox (to yourself) to which you attach this file. Receive the letter by phone, open the attachment in it, the system will offer to import contacts. %
Another simple option is to upload the file to your phone using a cable and a PC, then use the built-in file manager to go to the file and open it, the system will offer to import contacts (here you will need to install drivers for the PC to work with the device via a cable). %
You can also import contacts directly into your Google account via the web interface, for example on a PC, and from there synchronize with your device.
Programs and OS
Where can I download programs for Samsung Galaxy J7 for free?
How to find out the IMEI number of a phone?
How can I prevent my Android phone from automatically downloading firmware updates?
Automatic download of software updates is carried out only over Wi-Fi and only if the corresponding setting is installed on the phone. If a software update is downloaded to your phone, you can no longer install it; you can only postpone the installation, after which the phone will again ask you to install the downloaded update.
To disable: open the Settings section, go to the Options tab. Select About device, then select Software update. Uncheck the Wi-Fi only option to prevent automatic update download over Wi-Fi from starting.
In addition, you can disable the Auto Update option so that the phone does not check for updates and does not display a message about the availability of a new software version. You can manually check for a software update by selecting Update.
How can I disable automatic updates of applications from Google Play?
Launch the Play Store, open the Menu (swipe from the left edge of the screen) and enter Settings. In the General section, under Auto-update apps, select Never. If the Notifications option is checked, you will receive messages about the release of new versions of the application, but they will not be automatically downloaded or installed. At the same time, you can always update any of the programs manually.
How can I determine which contacts are saved in my phone’s memory and which are on the SIM card?
Near each contact you can find a symbol indicating the save location. Go to Contacts, view subscriber entries in the phone book. If you see a SIM card icon next to the entry, this means that the contact is saved on the SIM card. If there are no icons next to the contact, it means it is saved in the phone’s memory. %
Also in Contacts, you can see icons next to the subscriber’s name indicating that the contact is saved in a Google account and/or Samsung account.
How to add a widget to your desktop?
Go to Application menu, select the tab at the top Widgets, press and hold on the desired widget, and then place it on the desired place on the desktop.
What are Root rights and what are they for?
Root is superuser rights that allow you to gain full access to the operating system: changing system files, launching some third-party applications, backing up the system, etc.%
The first and only reason why the user is rooted is so that he can change the system partition, the rest is a consequence of obtaining root rights.
Yes, it is possible, but not all models support it. To start voice input, you should see a microphone icon on your keyboard (on the left next to the space bar). If it is not there and you see a gear icon (or some other), touch and hold it (this is the Settings button), an additional menu will appear in which you can select the microphone icon (Voice input), if it is supported by the device. Now press the microphone button and start speaking, Voice dialing is activated. %
Please note that voice input requires an Internet connection to work, but you can download a special language pack to work offline.
How to transfer files via Bluetooth?
Navigate to the file you want to transfer using a file manager (you can use the built-in one). From the menu, select Send (Transfer). A pop-up menu will appear with the available methods for sending the file. Select Bluetooth from the list (if it is disabled, the system will prompt you to turn it on). A list of devices available via Bluetooth appears, from which we select the desired phone to send.
How can I add/change a photo to a subscriber already existing in the phone book?
You can only add a photo to a contact saved in the phone memory. Subscribers whose phones are saved to the SIM card cannot add an image. %
1. Go to Contacts, select the person, touch and hold their name, then select Change. %
2. In the contact card, click on the picture next to the name, in the menu that appears, select the photo source (an existing picture or a photo from the camera), select an image or take a photo, click Done, then Save.
How to boot into safe mode?
Turn off your phone. Now turn it on with the power button, when Samsung appears on the screen, press and hold the volume up key.
After installing the program, its icon is automatically added to the desktop and I then have to remove it from there. Is it possible to disable this somehow?
Is it possible to scroll through songs in a playlist using a headset?
On my old phone, contacts were stored on a SIM card. How can I now transfer them from the SIM card to the phone book of my Android smartphone?
Go to Contacts -> press the Menu key -> (in some models, go to additional items -> Settings -> Contacts) -> select Import/Export -> Import from SIM card -> check Location for saving contacts (in this case Device) - > Select the contacts to transfer (or Select all) -> click in the top right corner of Done.
How can I download a special Russian language pack for voice typing so that I don't have to use an Internet connection when typing?
Press Menu -> select Settings -> Language and input -> Keyboard and input methods -> click on the gear icon next to Google Voice input -> Offline speech recognition. %
Go to the All tab -> Select Russian from the list -> click Download. %
Wait until the download completes, after which you can use the Voice Dialing function in offline mode.
Where in the settings is the SMS delivery report option enabled?
Go to Messages -> Menu -> Settings -> Delivery Report. Or Messages -> Menu -> Message settings -> Advanced -> SMS -> Delivery report (for Galaxy S7/S6).
Help me find speed dial settings so that when you long press one digit, the phone number of the specified subscriber is automatically dialed.
Click Phone -> Keyboard tab -> click Menu button -> Speed Dial. Now you can specify the number to which you plan to link the contact’s phone number, then specify the contact itself from the phone book.
How to delete a google account (without losing data)?
1. The most painless method for deleting an account is installing the ErazzerFree program. It allows you to manage Google accounts, including deleting them. The program requires root(superuser rights), obtaining these rights individually for each device. Deleting an account will take place without losing other data.
2. You can also reset the firmware to factory settings (wipe data / factory reset), but at the same time all data from the device will be deleted, and the software will return to its out-of-the-box state.
How to change the font?
If your machine has a standard font style function, use it to change the font. Go to Menu -> Settings -> Display -> Font -> Font Style.
If this function is not available, you will need root rights to install fonts manually and replace system fonts with third-party ones. Using third-party font replacement methods, you risk damaging the device's OS.
If the device is working normally, the reset can be performed directly through the menu. Menu - Settings - Backup and reset(sometimes Archive and Reset or Confidentiality is found) - Reset data(Reset device), select Reset the device or Delete all.
Why is my Skype status online all the time now, how can I fix it? I turned off the phone and rebooted - it didn't help.
1. To display the status correctly, you must exit the application only with the Exit soft button using the Skype program menu. It is this operation that sends a command to the Skype server to disconnect from it and, accordingly, change the status. %
%
2. If for some reason there are still problems with the status, then use any other device (for example, a PC), log into Skype, connect to the server in any mode except “Offline”, and enter in the chat window with any subscriber from the contact list (the subscriber may be offline) the following text commands and click the Send button: %
/showplaces %
*shows which devices you are currently logged into Skype from (initially there will be 2 or more). %
/remotelogout %
*exit Skype from all devices except the current one (which is what we need, since it will close your connection on the phone, and from the PC you will subsequently exit the status correctly). %
The commands are executed in the background and notify you of the result. %
%
You can now log out of Skype by disconnecting from the server and on your PC. Your status has become offline.
Why sometimes the built-in player does not want to play some tracks?
Possible solutions: %
- First of all, check whether the built-in player supports this file format. %
- Then try to play the track on your computer, making sure the file is working. %
- Check the name of the music file, it may be too long. %
- Go to the folder with the track and check other files in it to see if there is a file called nomedia. %
- As a last resort, try installing a third-party player.
What size picture should be used for wallpaper so that the system does not allow it to be stretched?
I installed a program/game, I didn’t like it, how can I remove it from my phone now?
Enter Settings, go to Application Manager (or Settings - Applications - Application Management), select the All tab, find the program you installed in the list, mark it and click Uninstall. %
If the application was installed from the Store, then there is another way: log into Google Play, go to the Downloads tab, find the program you installed in the list, mark it and click Remove.
Is it possible to somehow configure the display of the contact list, otherwise I have all contacts from different sources in one heap?
Go to Contacts -> Menu key -> select Show contacts -> here check the option for displaying contacts that suits you best.
If you need to display contacts from several sources, then: enter Contacts -> Menu key -> select Show contacts -> Customized list -> click Settings (gear) -> here tick the required source options -> click Finish.
Is there a built-in Flashlight application and how to enable it?
Available. Press and hold your finger on an empty area of the desktop. Then release and select Widgets. Here, find the Flashlight by swiping right or left. Touch and hold the widget and drag it to your desktop. Now with its help you can turn the flashlight on and off.
I need to manually set a static IP address for my Wi-Fi connection, where can I enter this information?
Enter Settings -> go to Wi-Fi (for further manipulations Wi-Fi must be turned on) -> Select an access point to connect from the list -> Check Show additional parameters -> Select Static in the IP Settings item and fill in the required fields data (IP address, gateway, DNS).
Before installing the application, I am shown a window with a list of permissions. What it is?
Permissions are a list of actions that, with your consent, this application can perform after it is installed on your phone. Please read it carefully before clicking the Accept button. On the one hand, this is a concern for security, on the other, power consumption and device performance.
I changed some settings in the program and it began to glitch, how can I return the settings to their original state without reinstalling the application?
Enter the settings, go to the Application Manager (or Settings - Applications - Application Management), then to the All tab, find the program with which you are having problems, tap on it, in the open window you will see that there are buttons that allow you to: erase application data (the settings will also be reset), clear the cache (effective when reinstalling, if you do not want to lose data and the application does not work), delete default settings (effective if you have assigned this application to a specific action by default).
I installed the program and now the phone cannot boot the system. What to do, how to remove it?
First, you need to try booting the phone in safe mode, which disables all applications installed after purchasing the device at startup, but at the same time displays them all in the settings. When the phone boots up (Android screensaver), press and hold the volume down button until safe mode appears (at the bottom left of the screen) and vibrates, release the button, it will boot into safe mode. Now you can remove the problematic program through the Application Manager using the standard method, and then boot into normal mode. %
If the phone does not boot into safe mode, you will have to do a factory reset.
How to turn off the every minute beep during a call?
Depending on the version of the operating system and mobile device, possible options may differ: %
1. Phone (dialer) -Settings - Other settings - Minute reminder - check (on)/uncheck (off). %
2. Settings - Applications - Call - All calls - Status signals - Per-minute signal. %
3. Phone - Settings - Accounts/Settings for calls - Call status signals - enable/disable.
How to leave a comment on an application in Android Market?
In order for you to leave a comment, you first need to install the application and vote for it, selecting the number of stars from 1 (terrible) to 5 (excellent). To vote, you need to register on the google+ social network.
How to backup your data from your phone?
Use the application to backup contacts, photos, music, applications, call logs, messages, passwords, browser history, etc. The data will be saved on the PC and can later be restored either to the same phone or to any other Samsung device. %
Launch the Smart Switch program on your PC, connect your phone via a USB cable.] Click More at the top right, select Settings. In the settings window, open the Backup Items tab and select the data to back up and click OK. In the main program window, click Backup and wait until archiving is complete.
How is multitasking organized in Android?
Android applications consist of several components. There are four types of components: Activities, Services, Broadcast receivers And Content providers.
Activities represent a graphical user interface for a specific task. For example, an SMS application may have one activity for displaying a list of contacts, one for creating a message, etc. An Activity can be in one of three states:
1. Active or running – in this state it is in the foreground and interacts with the user;
2. Paused – is in the background, but visible to the user, for example, partially blocked by a new activity;
3. Stopped – completely blocked by another activity. But it still retains its state, although it is completely hidden from the user.
In the Paused and Stopped states, the activity can be unloaded from memory. A situation may arise when the user, returning to the unloaded activity, would like to see it in the state in which he left it. This is possible if you call the onSaveInstanceState() method before unloading the activity, and call the onRestoreInstanceState() method when restoring or creating the activity. In this case, it is possible to save the current (at the time of unloading) activity state. Here we can draw an analogy with the hibernation mode in PC OS.
I installed the program, but it seems to me that it is exhibiting some kind of suspicious activity. How can I view permissions for an already installed application?
Go to Settings -> Application Manager (Applications) -> go to the Downloaded tab -> find the application in the list, tap on it, Application Details will open, scroll down (to Permissions).
How do I create a Dropbox account?
Settings -> Accounts -> Dropbox. Now select Sign up for Dropbox (if you need to create a new account). Enter your first name, last name, email address, set a password and click Create account. %
If an account was created previously and now you just need to add it, then Settings -> Accounts -> Dropbox. Now select Login and enter your account information.
When I try to enter the Camera application, the error Camera failure appears. How to get rid of it?
1. Clear Camera app data. Settings -> Application Manager -> All select Camera -> Clear data.. In most cases the problem will be resolved.
2. If cleaning does not help, then boot into safe mode. If the Camera works correctly here, then one by one remove third-party applications that were recently installed before the problem was fixed.
3. If step 2 does not help, then update the device software, if available.
4. You can radically solve the problem by resetting the device settings.
I don’t want to receive notifications from one of the sites, how can I disable them in Chrome?
Go to the Chrome Menu (three dots in the upper right corner), select Settings. Go to Site Settings - Alerts. In the Allowed section, select the required site. In the notification settings window for this site, in the permissions section, select Notifications, and in the window that appears, select Block. %
You will no longer receive messages from this site, but you can always reactivate them if you wish.
I have pictures with the Picasa icon in my gallery, how can I remove them from there?
Log into the Google+ app, click the control panel icon in the upper right corner of the screen and select Photos from the drop-down panel. Find the photo you want and click on it, now open additional options and select Delete photo.
Is there a built-in notification function for SIM card replacement in the device and how to enable it?
Available. Menu -> Settings -> Security -> SIM change notification. Here you will need to enter your Samsung account password. Enter it and click Confirm. In the Notifications window, enter the text that will be sent in the message when replacing the SIM card and click Yes. Set the phone number to which a message with the new SIM card number and IMEI will be automatically sent, click Finish. Select Save.
How to avoid disconnecting the Internet received via Wi-Fi? After locking the phone screen, the Wi-Fi connection is disconnected.
Settings -> Wi-Fi. In the upper right corner of the screen, click the three dots, in the context menu select Additional functions -> Wi-Fi in sleep mode. Select Keep on.
The phone is frozen and now won’t turn on, how can I do a hard reset and return the phone to its factory state? With the phone turned off, press and hold the Power, Home (central) and Volume+ keys simultaneously (if there is no Home key, then only Power and Volume+). Release the Power button after Samsung Galaxy appears, continue to hold the other two until the Recovery menu appears, this takes about 5-15 seconds. In the menu, go to wipe data/factory reset using the volume down button. Press the Power button to confirm your selection. Confirm your choice: Yes - Delete all user data using the volume down and power keys as in the previous menu. After clearing the data, select reboot system now from the main menu using the Power button. The phone will then turn on and then turn on. How to add a subscriber to an existing group of subscribers in the phone book? In Idle mode, tap the Contacts icon, find the person's contact entry, tap and hold it. From the menu that appears, select Add to Group. Select the required group in the list where you plan to add a contact, and click Save in the upper right corner. Why did some application icons in My Downloads become transparent when I connected my phone to the computer? Option 1: The phone connected to the PC is not compatible with these applications. % Can I create a backup of contacts and later restore them using the phone’s built-in tools? Use the Import/Export contacts function. My brother and I set up separate Google accounts on our phones so we could each use our own set of apps, etc. Can I place restrictions on his account on the device? Even if you are the owner of the device, you will not be able to control accounts other than your own, but nevertheless, you have the opportunity to limit other accounts by prohibiting the use of voice calls and SMS messages. It seems to me that the phone has become glitchy, how can I do a hard reset and return the phone to its factory state? 3. It is normal for the phone to heat up because electrical appliances generate heat when operating, so Samsung always tests and checks the temperature of the product during operation.
Option 2. This is not the phone on which the application data was previously installed, i.e. another device is connected. %
Option 3: Check the connection, it is possible that the phone is not connected to the PC.
To create a backup, go to Contacts -> press the Menu key -> select Import/Export contacts -> select Export to internal memory -> Confirm exporting contacts to the file storage/emulated/0/Contacts.vcf. You can view and copy the Contacts.vcf file using the built-in file manager My Files.
To restore from a backup, first check the presence of the file storage/emulated/0/Contacts.vcf; if necessary (for example, after a complete reset), copy the previously saved copy of the file into place. Go to Contacts -> press the Menu key -> select Import/Export contacts -> select Import from internal memory -> select a location to save contacts.
However, if any functions are not used and the phone heats up, then you need to contact a service center for repair.
Samsung *#9998*947# (without SIM)
standard codes - 1234 or 0000
reset eprom: *2767*2878#(remove code)
X100, X600 - remove simlock #*7337# block list *#7465625#
*2767*3855# - FULL E2P RESET
#*7337# - UNLOCK
*2767*688# - UNLOCK
*#0523# - CONTRAST
*#9998*523# - CONTRAST
SGH-600
*#06# -> Shows IMEI.
*#9999# -> Shows the software version.
*#0837# -> Shows software version (instructions)
*#0001# -> Shows Serial parameters
*#9125# -> Activates the smiley when charging.
*#9998*228# -> Battery status (capacity, voltage, temperature)
*#9998*246# -> Program status
*#9998*289# -> Changing the ringing frequency
*#9998*324# -> Debugger screen
*#9998*364# -> Watchdog
*#9998*377# -> EEPROM Error Stack - Use side keys to select values. Cancel and ok.
*#9998*427# -> Trace Watchdog
*#9998*523# -> Changing display contrast - Only for version G60RL01W
*#9998*544# -> Jig detect
*#9998*636# -> Memory status
*#9998*746# -> SIM file size
*#9998*778# -> SIM Service Table
*#9998*785# -> RTK (Run Time Kernel) errors - if ok then phn is reset, info is put in memory error.
*#9998*786# -> Run, Last UP, Last DOWN
*#9998*837# -> Software version
*#9998*842# -> Vibrator test - The screen backlight flashes for 10 seconds and the vibrator turns on.
*#9998*862# -> Vocoder Reg - Normal, Earphone or carkit can be selected
*#9998*872# -> Diag
*#9998*947# -> Reset On Fatal Error
*#9998*999# -> Last/Chk
*#9998*9266# -> Yann debug screen (=Debug Screens?)
*#9998*9999# -> Software version
*0001*s*f*t# -> Changes serial parameters (s=?, f=0.1, t=0.1) (incomplete)
*0002*?# -> unknown
*0003*?# -> unknown
SP unlock SGH-600 and SGH 2100
*2767*3855# -> Full reset l EEPROM (This code removes SP-lock!!)
But it also changes the IMEI to 447967-89-400044-0. To restore your old IMEI, use the appropriate software (at your own risk)
*2767*2878# -> User reset EEEPROM
This code was tested on Samsung SGH-600 with software version FLD_2C6 G60SB03X
SAMSUNG
a800 unlock - *2767*637#
Samsung
x100, x600 -
Unlock: #*7337#
Customer Reset: “*2767*2878#”.
WAP Reset: “*2767*927#”
Full Reset: “*2767*3855#”
Samsung
*2767*3855# - FULL E2P RESET
*2767*2878# - CUSTOM E2P RESET
#*7337# - UNLOCK
*2767*688# - UNLOCK
*#0523# - CONTRAST
*#9998*523# - CONTRAST
*#8999*8378# - Service Menu (X100)
*#06# - show IMEI Samsung Galaxy J7 (2016) IMEI (from English International Mobile Equipment Identity) is a 15-digit international identifier for mobile gadgets. Essentially, this is a serial number that is determined by the operator when the phone is connected.
*#8888# - shows Hardware Version Samsung Galaxy J7 (2016)
*#9999# - show the firmware version of Samsung Galaxy J7 (2016)
*#8999*8376263 - Samsung Galaxy J7 (2016) firmware data
*#8999*324# - various technical data
*#8999*636# - technical specifications of Samsung Galaxy J7 (2016)
*#8999*523# - display contrast, the same as through the main phone menu
*#0523# - contrast
*#2255# - call log for Samsung Galaxy J7 (2016)
*#0837# - display the software version
*#0001# - show serial number
#*7337# - unlock Samsung Galaxy J7 (2016)
*#8999*377# - error log for Samsung Galaxy J7 (2016)
*#4777*8665# - setting up GPRS Samsung Galaxy J7 (2016)
*#0020# - setting the default menu language
*#0007# - sets the text mode to Russian
*#9125# - setting emoticon modes in charging mode
*#7465625# - block list
*7465625*638*# - network blocking
*#9998*228# - battery status (capacity, voltage, temperature)
*#9998*246# - software status of Samsung Galaxy J7 (2016)
*#9998*289# - change the alarm frequency
*#9998*324# - debugging screen
*#9998*364# - Watchdog
*#9998*544# - Jig detect
*#9998*636# - memory status of Samsung Galaxy J7 (2016)
*#9998*746# - SIM file size
*#9998*837# - software version of Samsung Galaxy J7 (2016)
*#9998*842# - vibration alert test Samsung Galaxy J7 (2016)
*#9998*872# - diagnostics of Samsung Galaxy J7 (2016)
*#8999*8378# or *#8999*test# -Test Mode
*#9998*999# - last check
*#9998*523# - contrast
*#9998*947# - reset in case of a critical error (entered without a SIM card, deletes all files, may cause the camera to malfunction)
*2767*3855# - full EEROM reset (SP unlock, but can change phone IMEI)
*2767*2878# - user reset EEPROM
*#0228# - find out battery temperature, type and charge of Samsung Galaxy J7 (2016)
*#9998*JAVA# - JAVA - CSD and GPRS settings for Internet Samsung Galaxy J7 (2016)
*#9998*VERNAME# - extended information about firmware, hardware, time and date of software creation, etc.
STANDARD GSM CODES FOR Samsung Galaxy J7 (2016)
Change PIN - **04*, then enter the old PIN, and the new PIN twice.
Change PIN2 - **042*, then enter the old PIN2, and the new PIN2 twice.
Unlock SIM card (PIN) - **05*, then enter PUK and new PIN twice
Unlock SIM card (PIN2) - **052*, then enter PUK2 and new PIN2 twice
Call forwarding Samsung Galaxy J7 (2016) (you must order the service from your operator)
Cancel all forwardings - ##002#
Cancel all conditional redirects - ##004#
Activate all conditional forwardings - **004*Phone number#
Unconditional forwarding (forwarding all calls)
Turn off and deactivate - ##21#
Deactivate - #21#
Enable and activate - **21*Phone number#
Enable - *21#
Check status - *#21#
Forwarding in case of "no answer"
Turn off and deactivate - ##61#
Deactivate - #61#
Enable and activate - **61*Phone number#
Enable - *61#
Check status - *#61#
Setting the call time before the "no answer" call forwarding is triggered
When setting up call forwarding on "no answer", you can set the time in seconds that the system gives you to pick up the phone. If you do not pick up the phone during this time, the incoming call will be forwarded.
Example: - **61*+709576617601234**30# - sets the wait time to 30 seconds
Set the waiting time - **61*Phone number**N# , N=5..30 (seconds)
Remove previous installation - ##61#
Forwarding in case of "not available"
Turn off and deactivate - ##62#
Deactivate - #62#
Enable and activate - **62*Phone number#
Enable - *62#
Check status - *#62#
Forwarding when busy
Turn off and deactivate - ##67#
Deactivate - #67#
Enable and activate - **67*Phone number #
Enable - *67#
Check status - *#67#
Call barring (you must order the service from your operator)
Change password for all bans (default - 0000)
- **03*330*old password*new password*new password#
Activate - **33*password#
Deactivate - #33*password#
Check status - *#33#
Barring all calls on Samsung Galaxy J7 (2016)
Activate - **330*password#
Deactivate - #330*password#
Check status - *#330#
Barring all outgoing international calls on Samsung Galaxy J7 (2016)
Activate - **331*password#
Deactivate - #331*password#
Check status - *#331#
Barring all outgoing calls on Samsung Galaxy J7 (2016)
Activate - **333*password#
Deactivate - #333*password#
Check status - *#333#
Barring all incoming calls on Samsung Galaxy J7 (2016)
Activate - **353*password#
Deactivate - #353*password#
Check status - *#353#
Barring all incoming calls when roaming
Activate - **351*password#
Deactivate - #351*password#
Check status - *#351#
Call waiting Samsung Galaxy J7 (2016) (you must order the service from your operator)
Activate - *43#
Deactivate - #43#
Check status - *#43#
Send your phone number (Anti Caller ID)
Deny - #30#phone number
Allow - *30#phone number
Check status - *#30#
Display the phone number of the person calling you (Caller ID)
Deny - #77#
Allow - *77#
Check status - *#77#
Questions about Samsung Galaxy J7 (2016) secret codes
Ask a question about secret codes on Samsung Galaxy J7 (2016)


")