Installing or reinstalling Windows is a fairly simple and automated operation, however, only if you have a working disk drive or at least a flash drive with a recorded image of Windows XP, 7 or the desired version. Reinstallation can be more problematic, especially when you need to save data. And if there is no disk or flash drive, how can you install and reinstall in this case? Our article will describe in detail how to reinstall a working version of Windows 7 without using a disk or flash drive.
Short description
The operation itself is quite simple, and for an experienced user the introductory words will suffice. Let's break the process into several stages:
- Hard drive compression and allocating the required amount of memory.
- Copying data from the OS image to a previously prepared memory area.
- Creating an installation disk, which is located inside the selected memory area using the EasyBSD utility.
- Installing Windows OS, as well as its configuration.
These factors will be described in more detail below, so that any user will be able to figure out how and what to do.
Downloading the necessary utilities
For this you will need the Daemon Tools program. You can download it from the official website. It takes up little space on your hard drive and is also not demanding on resources. You should also download an even smaller utility called EasyBSD. It can also be downloaded from the official website. It is with the help of the latter that we will carry out the entire operation of reinstalling and installing Windows without a flash drive or disk.
Preparing a partition for installation files
Create a section
The first step is to install a partition on the disk where the installation files of the Windows operating system will be stored. To do this you need to go to " Disk Management" To get to this submenu, you need to right-click on “ My computer", there select the tab " Control", and it contains " Disk Management" You can also enter “ Disk management» and you will immediately be taken to the desired page. There you can also track the amount of memory on a flash drive or other devices. The option we need looks like this:
Here you can see the amount of available and busy information on the hard drive. For our operation it is important that the hard drive is narrower divided into two sections, like on a picture. After fulfilling this factor, we divide the second disk (in our case D) into two different sections. To do this, right-click on drive D, and there select the tab “ Shrink Volume" After clicking, a window pops up asking you to enter how much to compress the disk. You need to enter a value slightly larger than the size of the Windows image. Although there is often enough memory for laptops, in order to save enter megabytes 150–300 more, than the image weighs. Click " Compress" The compression itself will not last long - about five minutes, no more.
Converting a Partition
After that, we need to convert the space we just shrunk into a clean partition. By right-clicking on the rectangle indicating unallocated space, select the “ tab Create a simple volume" It looks something like this:

The wizard will start. Without much thought, we click on the Next button everywhere, there is nothing particularly important in it. After creating the volume, we proceed to the main part of the work.
Copying installation data
Opening Daemon Tools Lite or another version available on your laptop, select the image with Windows 7 or 8. The next step is to click on the “ tab Add Image" After it appears in our program, click on “ Mount" A screenshot of this operation is given below.

From the virtual drive we copy all the data, including folders and files, to a small disk that we created about 10 minutes ago. You can find out the name of the disk by looking at the letter located under the button panel.
Creating a virtual disk
The next step will be to work with the latest utility, which is called EasyBCD. After starting the program, click on Add entry. Among several tabs, select WinPE. In the name field you need to enter the name of the section we created. By default, in all laptops on which Windows is installed, it is called “New Volume”. So we write in the “Name” category. Let there be a file in “Path” boot.wim which is in the folder sources inside the image.

Windows installation
After completing the entire operation, click on the button Current settings. With its help, you can make sure that your actions were not in vain. If a new entry appears: congratulations, you have completed all the work yourself. As you can see, installing or reinstalling Windows without a disk and without a flash drive is very simple! After restarting the computer or laptop, in the special menu for selecting the operating system, select “ New Volume"and start the standard process of installing or reinstalling Windows.
Features for Windows XP
It is worth noting that installing Windows XP is a little different. The process itself has changed significantly and more data is required from the user. Therefore, there are problems with Windows XP when they try to install it not from a disk. This trick allows the installation of Windows 7.8, but does not provide the ability to install XP due to the absence of some data, for example the file boot.wim, which is needed for one of the most important installation processes. If you want to install Windows XP, then you need a slightly different reinstallation method. One of the simplest is system update. However, reinstalling XP using this method will only update the system and will not install another OS.
Reinstalling XP from your hard drive will allow you to perform an operation that is similar to the previous one. The difference between them is that the latter option will help even when the system does not boot.
First you need transfer the distribution folder to your hard drive.

After this, we do not need to update the system, but install it completely again by selecting " New installation» in installation mode. The next step will be collecting data and general installation of Windows XP in the usual version - as from a disk. Your OS will be in the folder windows.0, however it can be renamed.
Video on the topic
Installing the operating system today does not cause any difficulties even for inexperienced users, provided they have the necessary media. However, there are situations when it is impossible to use either a disk or a flash drive to perform this operation. In this article, we will provide instructions on how to reinstall Windows 7 without using physical installation media.
In order to carry out this procedure, you need to acquire two programs and an image with the “seven” distribution kit. We will talk about where to find the necessary software below, and the image can be obtained by entering a query like this in a search engine "download Windows 7".
Please note that all actions must be performed from an account that has administrator rights.
Step 1: Download and install programs
To work, we will need two programs - Daemon Tools Lite and EasyBCD. The first is needed to mount the image and copy files from it, and the second is to create a boot record. You can read in detail about the first program and download it to your PC on our website.
We need a free version. To receive it after going to the official website, click "Download" in the corresponding block.


At one stage, the installer will once again ask you to decide on the version.

Otherwise, the installation is quite standard, but with the appearance of dialog boxes asking you to install drivers. We agree everywhere.

The following program also has a free edition. To download it, you need to go to the page using the link below, scroll down and click the button "Register".


After the software has been downloaded and installed, you should launch it and select the interface language. You only need to do this once.

Step 2: Preparing the Disk
To continue the operation, we will need to create a small partition on the system disk to copy the installer files.
- Right-click on the shortcut "Computer" on the desktop and select "Control".

- Let's go to "Disk Management", select the system volume (usually “C”), right-click on it and proceed to compression.

- At this point, you need to determine the size of the image so that it fits into the new partition. We find it, right-click and go to "Properties".

We look at how much space the file takes up on the disk and, to be sure, add 500 megabytes to this value.

- In the window "Compress C" in field "Size of compressible space" write the resulting number and press "Compress".

- Now disk 0 has unallocated space of the required size. Right-click on it again and select "Create Simple Volume".

- In the window "Masters" let's move on.

- Leave the size as is.

- We also do not change the letter.

- For convenience, we assign a label to that, for example, "Install".

- Click "Ready", after which the partition will be created.

Step 3: Copy Files

Step 4: Create a boot entry
- Launch the EasyBCD program and go to the tab "Add a note". In the block "Removable/external storage" select a section "WinPE". In field "Name" we write "Install"(here you can set any name: this will be the name of the item in the boot menu).

- Click the review button shown in the screenshot.

We go to the previously created partition (not to the drive with the mounted image, this is important), go to the folder "sources" and select the file boot.wim. Click "Open".

- We make sure that the path is correct and press the green button with a plus.

- Let's go to the tab "Current menu" and see our new entry.

Step 5: Installation
The procedure for installing the operating system using this method is slightly different from the standard one.
- Reboot the machine and use the arrows to select the installer in the boot menu. In our case it is "Install". Click ENTER.

- Setting up the language.

- We start the process with the corresponding button.

- We accept the terms of the license agreement.

- Select the full installation.

- In the next window click "Disk Setup".

- We select sections one by one, except "Install", and press "Delete".

Confirm the operation with the button OK.

- As a result, only our section with the installer will remain and "Unallocated disk space 0". Select it and click "Further".

- The system installation procedure will begin.

Further actions will be similar to the standard installation. They are described in the article at the link below (from paragraph “Stage 3: Initial system setup”).
Conclusion
As a result, we get a pristine “seven”. Don't forget that it needs to install important updates for optimization, support for new programs and security.
We learned how to reinstall Windows without using physical storage devices - disks or flash drives. This skill will help you complete the procedure in cases where for some reason (virus attack or malfunction) it is not possible to connect removable media. The main condition for a successful operation is care during preparation. Don’t get confused about where to “load” from boot.wim into the EasyBCD program: this must be a created partition, not a drive with a Windows image.
To install Windows 7 on computers that do not support a disk drive (for example, netbooks), you can use a flash drive, the volume of which must exceed 4 GB to completely accommodate all the distribution files necessary for correct installation and subsequent operation of the system.
Before installing Windows 7, you will need to download an operating system image. This can be done both on the official Microsoft mirror and on third-party resources. After downloading the image, you will need to install a program that will allow you to format the flash drive into the desired format and record all the files in the image. Among the most convenient programs for recording Windows 7 is the Windows 7 USB/DVD Download Tool. The program is available on the official Microsoft website and allows you to write a licensed image to removable media.
Flash drive recording
Insert the USB flash drive into the device and run Windows 7 USB/DVD Download Tool. A simple program interface will appear in front of you, through which the already downloaded image is recorded. Click on the “Browse” button and specify the path to the ISO system image file that you downloaded earlier. Once selected, click "Open".
After specifying the path to the image, click on the Next button to proceed to writing the image to removable media. In the next menu, select USB Device. In the list provided, select the name of your flash drive, and then click Begin copying. Next, click Erase USB Device, and then confirm the information. After this, recording the image to the USB flash drive will begin, the process of which you can monitor in the main program window. Once the record status line is 100% full, you will see the Backup Completed message. The image recording is complete and you can begin installing the system.
Actions after recording
Before reinstalling the system, save all important files on separate media, as documents may be deleted during the installation process. After this, go to the computer's BIOS by pressing the Start Setup key (F2 or F4) when the computer boots. Go to the Boot section and select the name of your flash drive as First Boot Device. Save your changes and restart your computer. If the image was recorded correctly and the BIOS settings were specified correctly, installation and initial configuration of the operating system will begin.
Now we will look at how to reinstall Windows 7 without using a disk, flash drive or BIOS. When working on a computer, users are faced with the need to reinstall Windows 7 for some reason.
In some situations, the user has no choice: the operating system is malfunctioning, it needs to be reinstalled urgently, but there is no way to do this using standard methods. Let's consider possible situations in more detail.
To install the operating system, use a disk drive or USB connector on the computer into which an optical disk or USB flash drive containing Windows is inserted. To boot from these devices you need to enter the BIOS settings.
Installing Windows 7 without disk, flash drive and BIOS
Typically, Windows 7 is installed from a DVD or bootable USB flash drive. To select boot media, you must enter the BIOS or the Boot Menu. But bad luck, it may happen that it will be impossible to fulfill these conditions.
For example, the optical drive on the computer is broken or there is no disk drive on the device at all, which means we won’t be able to use the DVD disc. How to reinstall Windows 7 without a disk?
No problem, there is a backup option: create a bootable USB flash drive. What if there is no flash drive available, and the system urgently needs to be reinstalled? How to reinstall Windows 7 without a flash drive?
Some users have difficulty entering the BIOS because they do not understand what to do there in order to correctly select the right disk to boot Windows.
Even in this seemingly hopeless situation, there is a conclusion. We will try to reinstall Windows 7 without a disk or flash drive from the Desktop, without entering the BIOS.
In order for us to succeed, the following conditions must be met:
- the computer must have a working Windows 7 installed, which must be reinstalled;
- we will need an image of the Windows 7 operating system from which we will reinstall the OS.
There are two ways to start Windows installation:
- By unpacking the system image in “.ISO” format using an archiver, and then running the “Setup” file as an administrator.
- Performing Windows installation from a virtual drive.
In the first case, the Windows 7 disk image file will be unpacked into a folder on the Desktop, and the user will start installing the system from this folder.
To use the second method, you need to install a special program on your computer - a virtual disk emulator, for example, the free Daemon Tool Lite program. The program creates a virtual drive on the PC, which the system recognizes as a regular physical CD/DVD/Blu-ray drive. The operating system is installed using a virtual drive.
Reinstalling Windows 7 without a disk or flash drive
In this article, we will look at instructions for installing Windows directly from a running operating system. We will use the Daemon Tools Lite program, which must first be installed on your computer.
Before you start installing Windows, save important data to a flash drive, external hard drive, etc., because when you reinstall the operating system, all files will be deleted in the “Windows.old” folder. Experienced users will be able to get old system files from there until this folder is deleted from the computer.
To start installing Windows 7, right-click on the Windows 7 image, first select “Open with” and then “DAEMON Tools Lite Agent”.
The Windows 7 installer window will open on your desktop. Click on the “Install” button.
In the “Receive important updates” window you are prompted to choose one of the options:
- Connect to the Internet to obtain the latest installer updates (recommended).
- Do not download the latest installer updates.
We need to reinstall the operating system and updates can be installed later. Therefore, you should choose the second option, refusing to download the latest updates, so as not to delay the Windows 7 installation process.

In the “Read the license terms” window, check the “I accept the license terms” checkbox.

The Select Installation Type window offers two options:
- Update - updating the system over a previous installation, preserving files, settings and programs.
- Full installation (advanced options) - installation of a new system with the removal of all data from the previous copy of Windows.
We need to reinstall the operating system, so we select the full installation type.

In the “Select a partition to install Windows” window, the partition into which the system will be installed is selected. The system will be installed in the partition in which the previously installed Windows was located.

A window will open warning you that the selected partition contains files from a previous Windows installation. This data will be transferred to the “Windows.old” folder, the user will be able to access files from this folder until it is deleted from the PC.
Agree, click on the “OK” button.

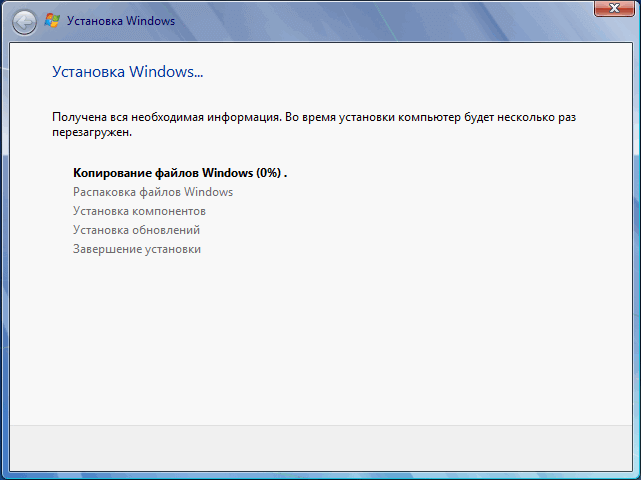
The Windows 7 installation process begins, during which the computer will restart several times.
At the final stage of installation, you will need to select the country, time, currency and keyboard layout.

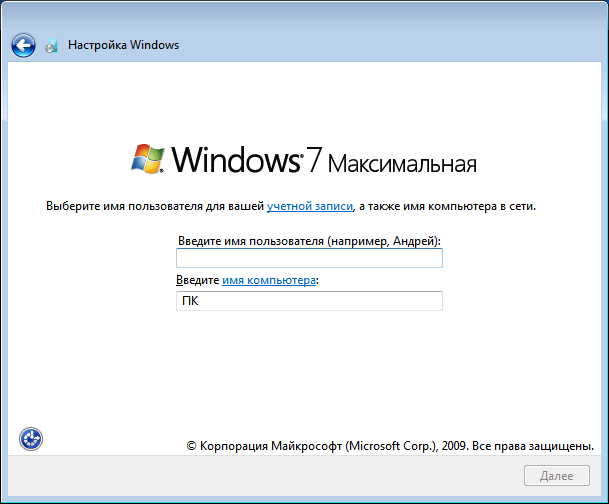
Select a username for your account.
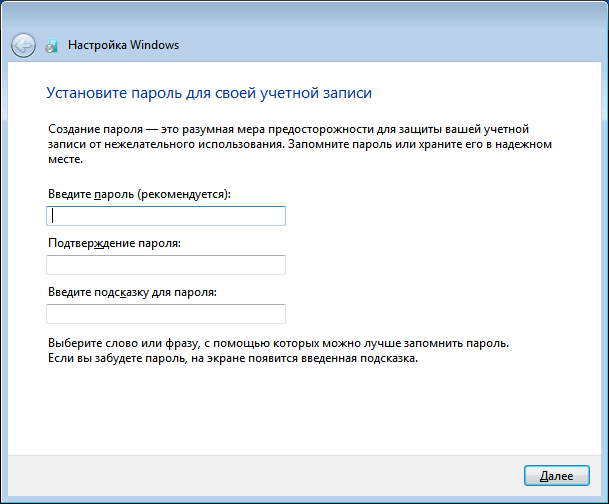
Enter your account password. If you are not using a password, leave all fields blank.
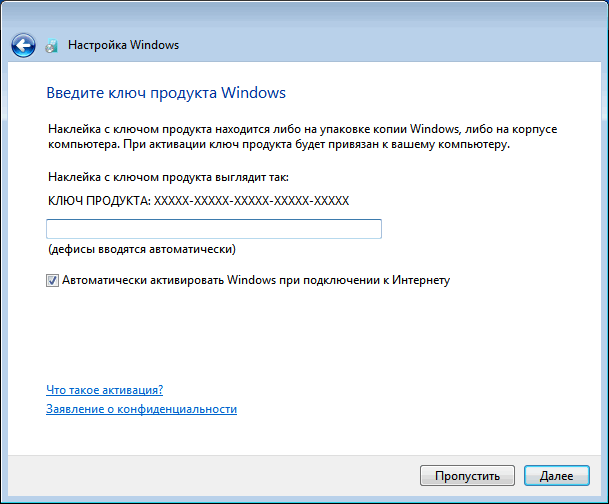
You can skip entering your Windows product key by activating your operating system later.
Select options for receiving updates:
- Use recommended settings - install important and recommended updates.
- Install only the most important updates - install only security updates and other most important updates.
- Postpone the decision - do not install updates for now.
Click on your preferred update option.

In the Check Date and Time Settings window, select the appropriate options for your location.

In the “Select the current location of your computer” window, you must select the network location parameters:
- Home network - the computer is at home.
- Working network - the computer is at work.
- Public network - the computer is located in a public place.

After completing the settings, a “clean” Windows 7 will start on the computer, installed instead of the previous system.

How to reinstall Windows 7. A detailed description of reinstalling Windows 7 from start to finish.
To reinstall Windows 7 for dummies we will need:
- Download Windows 7
- Burn Windows 7 to a disk or flash drive with Windows 7
- Set to bios First Boot Device - Cd-Rom or USB
- Install Windows 7
Step No. 1 Reinstalling Windows 7. Burning a Windows 7 disc
So, let's say you bought a laptop with Windows 7 or just want to try it out and then buy it. First, you need to download the Windows 7 image. Look carefully at which Windows 7 you need to download so that the key located on the laptop will fit. Usually the key is located either on the laptop or under it. For example, like this: Windows 7 basic OEM 32-bit(x86). Search the Internet for Windows 7 basic OEM 32-bit so that your key will fit! Since the distribution of Windows is illegal, we do not have the right to post original iso images with Windows 7 here. (Or - (Google search for MD5))
After downloading the Windows 7 ISO image, you need to burn it to disk.
To do this, download the program for burning our image to disk Portable ImgBurn
After the Windows 7 ISO image and our ImgBurn program are successfully downloaded:
- Take a blank DVD +-R | RW and insert into DVD rom
- ImgBurn -> click Browse-> choose our Windows ISO image, press Open
- Set the minimum speed and start recording
- After the disc is burned, a window will pop up indicating that the disc was successfully burned, click OK. And your DVD rom will automatically open with Windows 7 written on it
Step No. 2 Reinstall Windows 7. Set First boot device CD-Rom in BIOS
So, after Step No. 1, we have a disk with Windows 7. At this stage, our task is to get into the BIOS and set the disk with Windows 7 installed to initially boot. To do this: Reboot or turn on the computer and press the delete key (there are others options, e.g. F1, F2, F8, Ins.)
The initial splash screen should usually show you which key to press to enter the BIOS
As a result, we should get to the BIOS blue screen, in our case it looks like this
We set the first download from Disk, for this we go (with the usual arrows) to Advanced Bios Features -> First Boot Device select CD-Rom, press Enter, then Esc, go to Save&Exit Setup Press Enter, then Y and Enter again.
Note: if you have a different BIOS, the essence does not change. The main thing is to find First Boot Device and select CD-Rom
After step 2, the computer reboots itself and if you did everything correctly, then when you reboot, the message Boot from Cd/Dvd will appear on a black background:
And after a while Press any key to boot from Cd..
(press any key on the keyboard to boot from the disk), press the key. If a black screen appears with a Windows 7 installation bar, then at this stage you have done everything correctly
Step No. 3 Reinstall Windows 7. Formatting the partition. Installing Windows 7
After the window popped up. We wait 5-7 minutes until the language selection window appears. Select the language settings as you wish, then click Further
Click “Install”
We wait 5-7 minutes, after which a window will pop up, check the box with “License Terms”, click Further
Select “Full installation”
Select our disk, then click “Disk Setup”
Select an item "Format"
Attention! (warning about deleting data from drive C. Everything will remain on D):
This action will delete all your files from this partition, disk C:/
After “Copying Windows files” appears, we can safely go have a coffee, since no action will be required from us for 10-20 minutes
We wait until a window appears where we will be asked to enter a username. Then enter the name
Password (we don’t have to enter it, just click next)
Enter the product key (if you want to enter it later, you can click “Next”)
We choose one of three update points if desired! We recommend the first one!
All that remains is to select the time zone, which is what we do.
We wait 2 minutes, then a magic window with Windows 7 appears. Congratulations, Windows 7 has been successfully installed!


